# Configuring Elastic Path
# Prerequisites
Before starting, here are some prerequisites that you need to properly set up this integration.
- Elastic Path Commerce Cloud account
- Vue Storefront Enterprise Licence
# Credentials
You can find the credentials you will need to run this project in the home page of your Elastic Path dashboard.
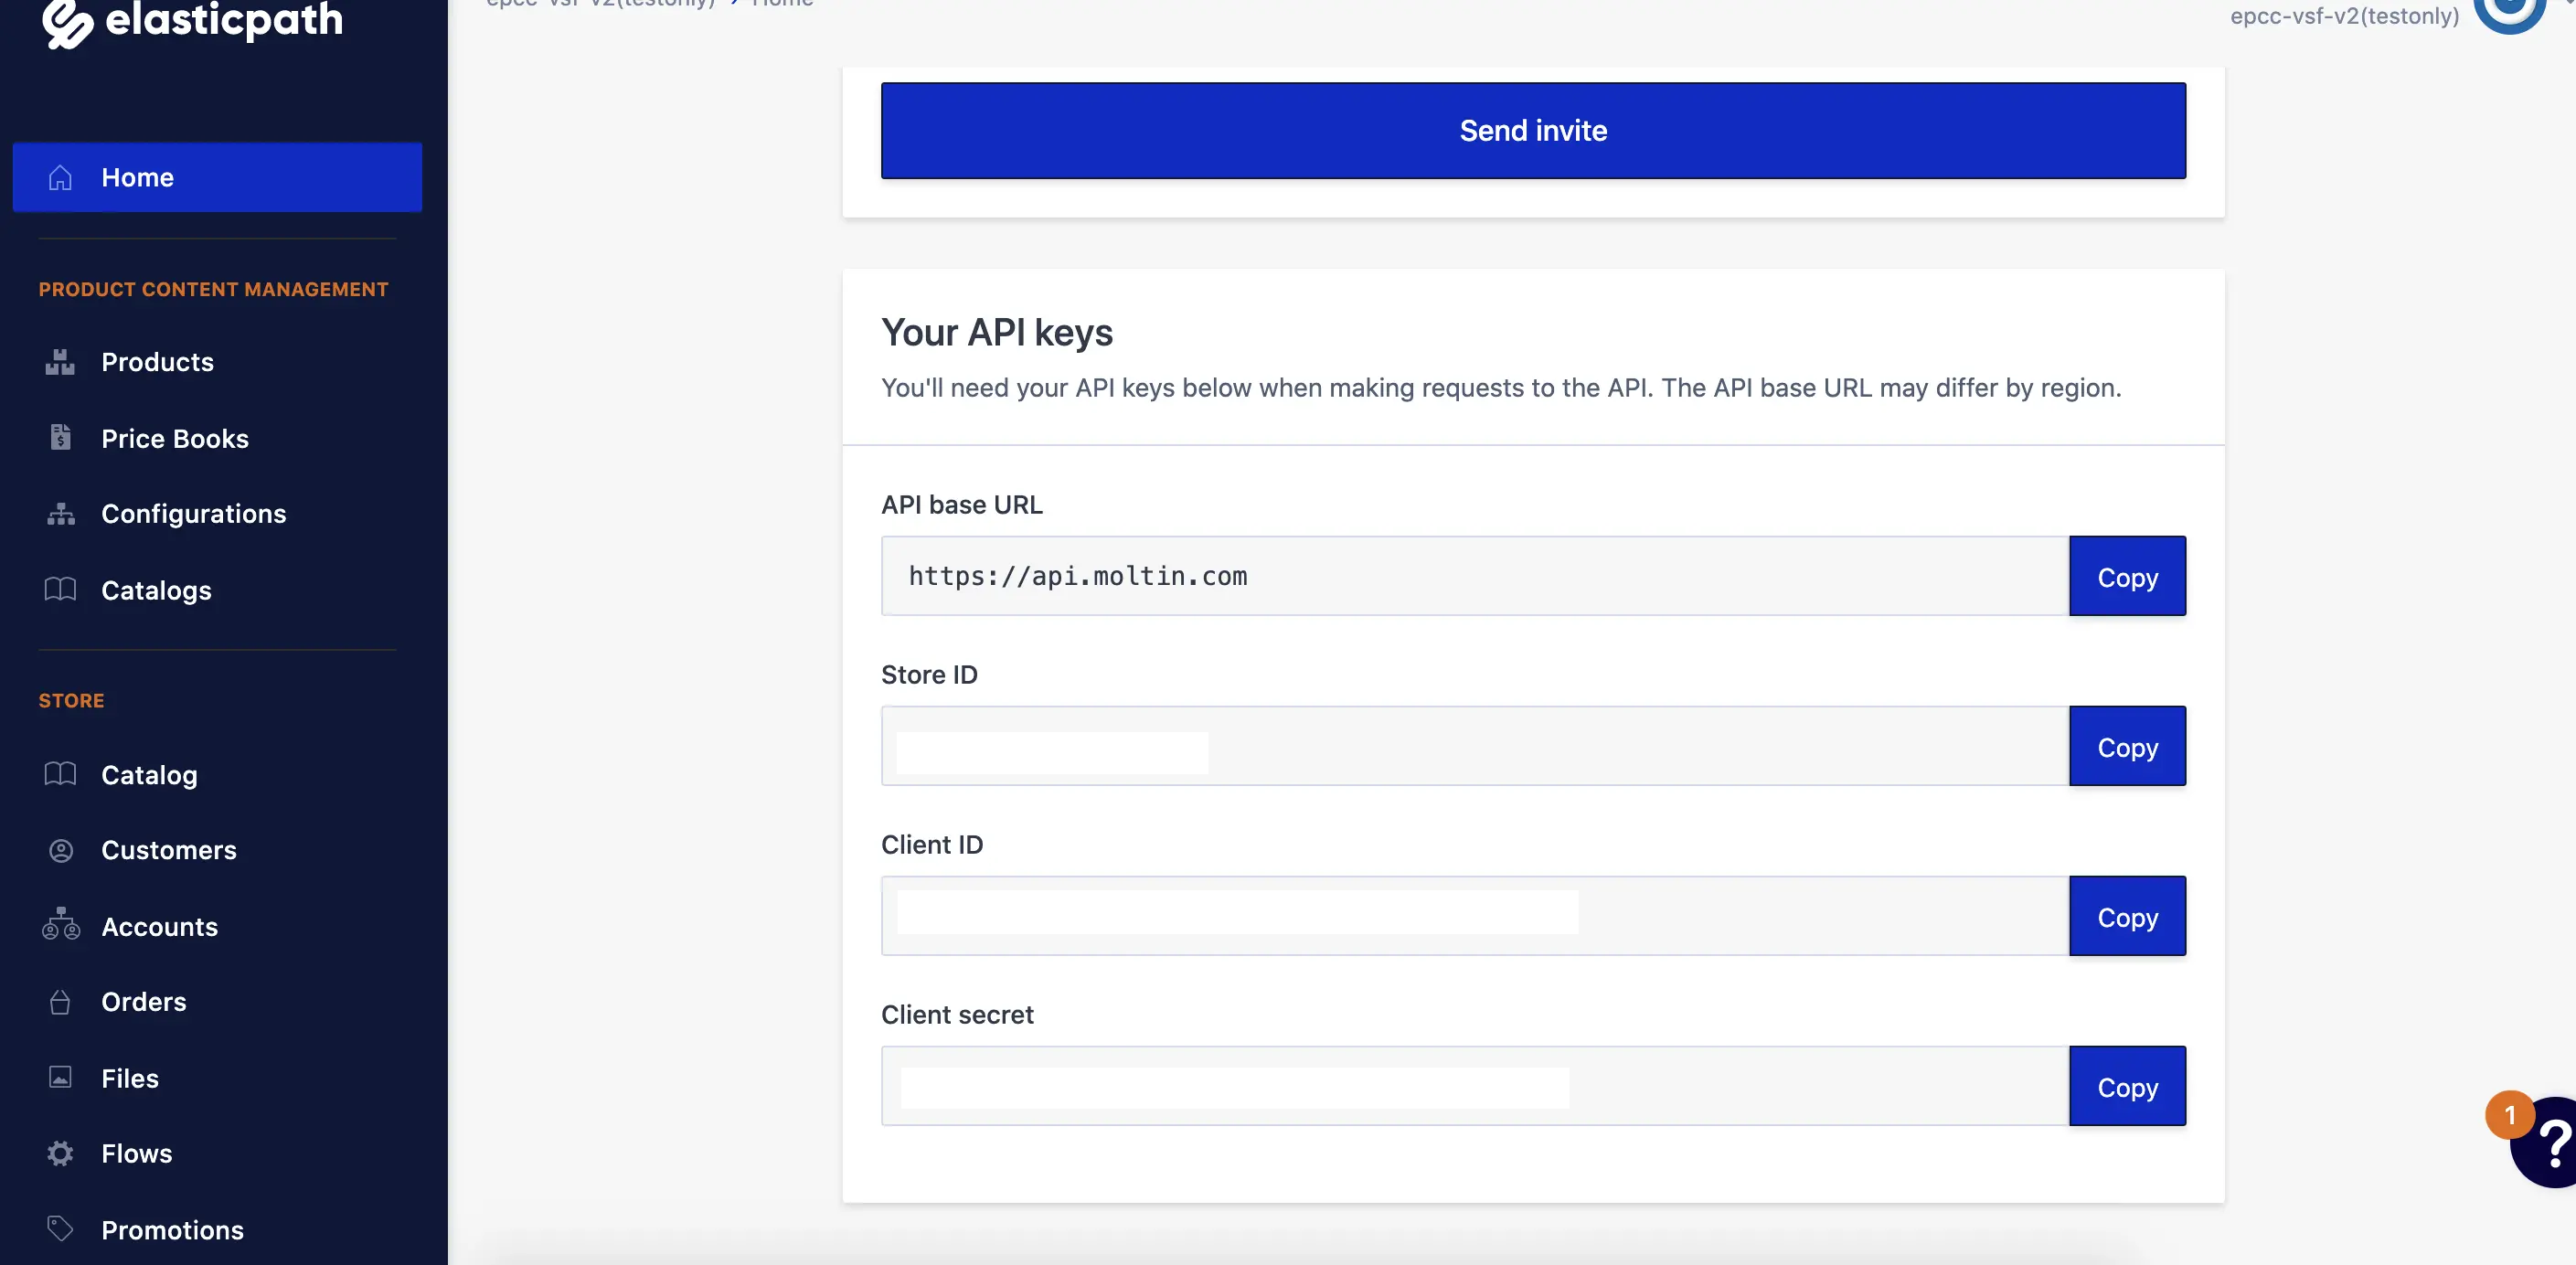
You will need:
Client ID(will beEPCC_CLIENT_IDin the project)Client secret(will beEPCC_CLIENT_SECRETin the project)
# Setup
This setup will require some manual configuration on the Elastic Path platform.
We'll walk through the entire process step-by-step.
# 1. Create a new store
- Click on your name in the header and in the dropdown click
Stores. - Click the button
Create new storeon the top of the page - Enter a store name and click
OK
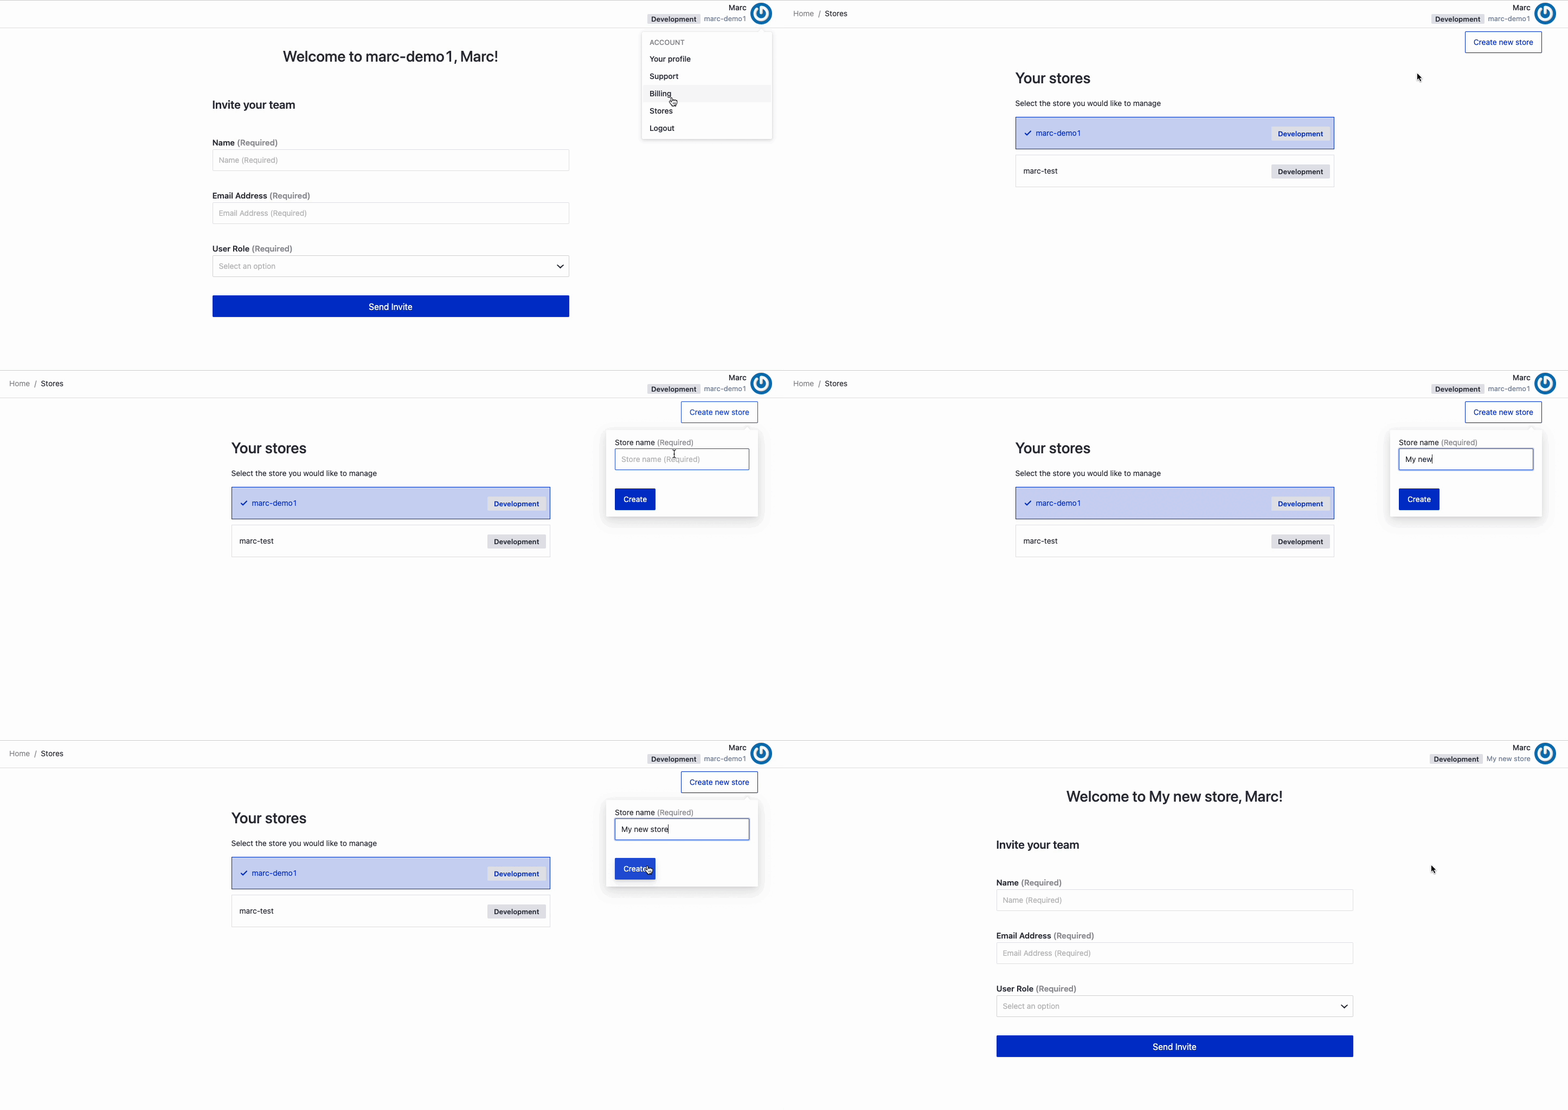
ℹ️ After the store is created, you will automatically be changed into that new store.
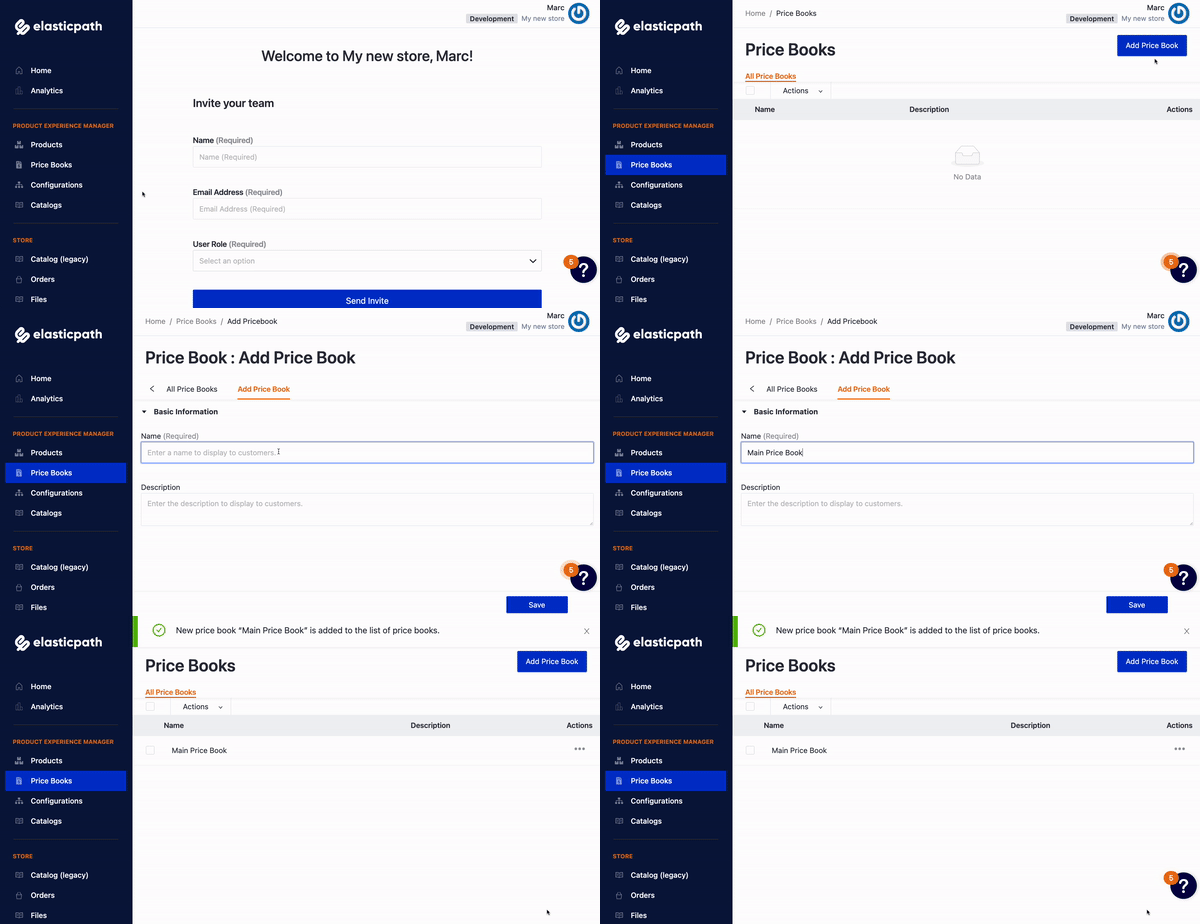
# 2. Create a price book
- On the left sidebar, click
Price Books - Click the button
Add Price Bookon the top of the page - Add a name and description (optional) to the price book
- Click the
Savebutton on the bottom of the page
# 3. Create products
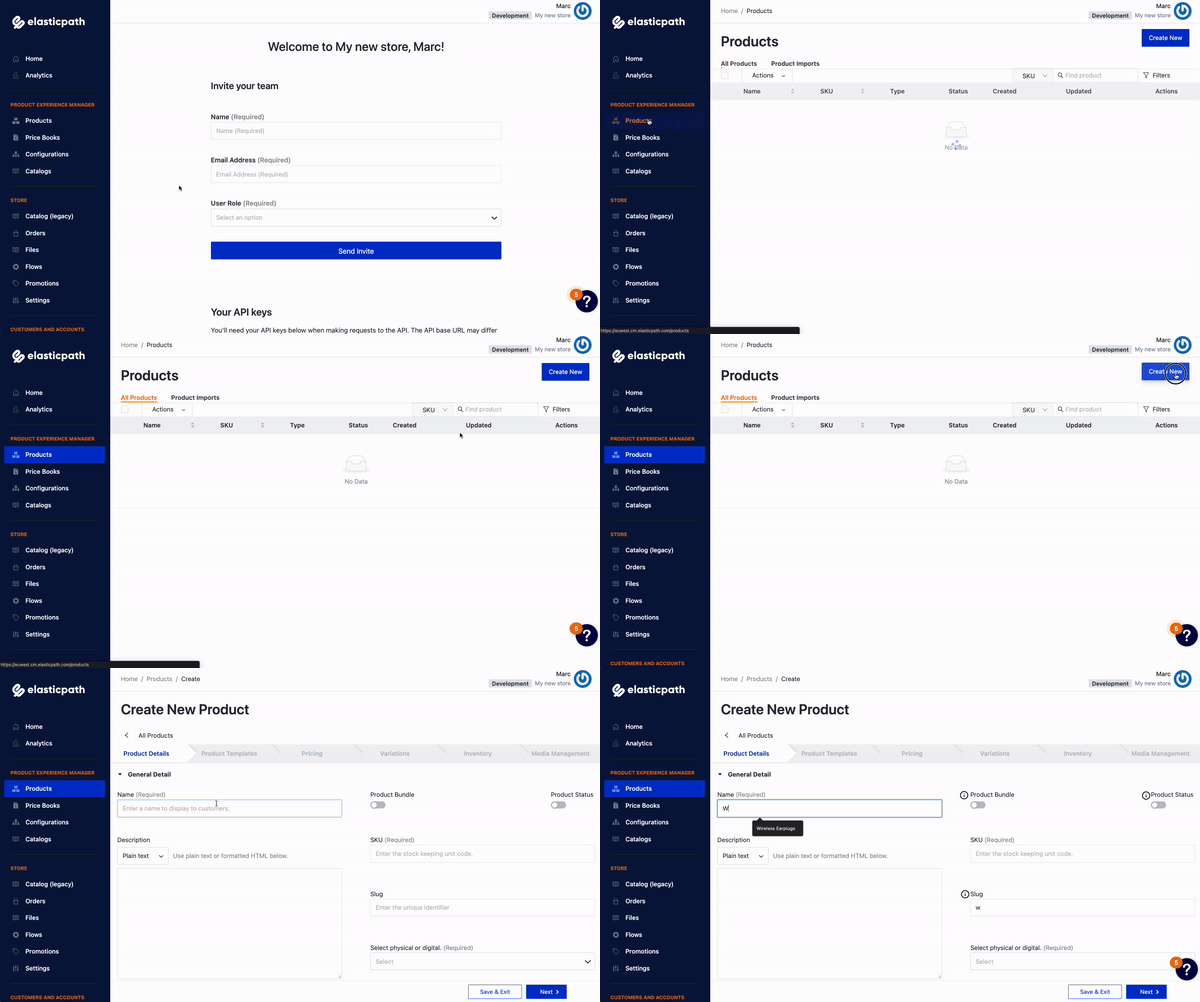
- On the left sidebar, click
Products - Click the button
Create Newon the top of the page - Enter the product details (required: Name, SKU, Physical/digital)
- ⚠️ Important: Toggle
Product Statusto green (on) during this initial setup - In the
Pricingtab, select the price book from the previous step and enter a price - If you want to add an image, you can do that in the tab
Media Management - Click the
Save and Exitbutton on the bottom of the page
# 4. Create & configure a hierarchy
# Create
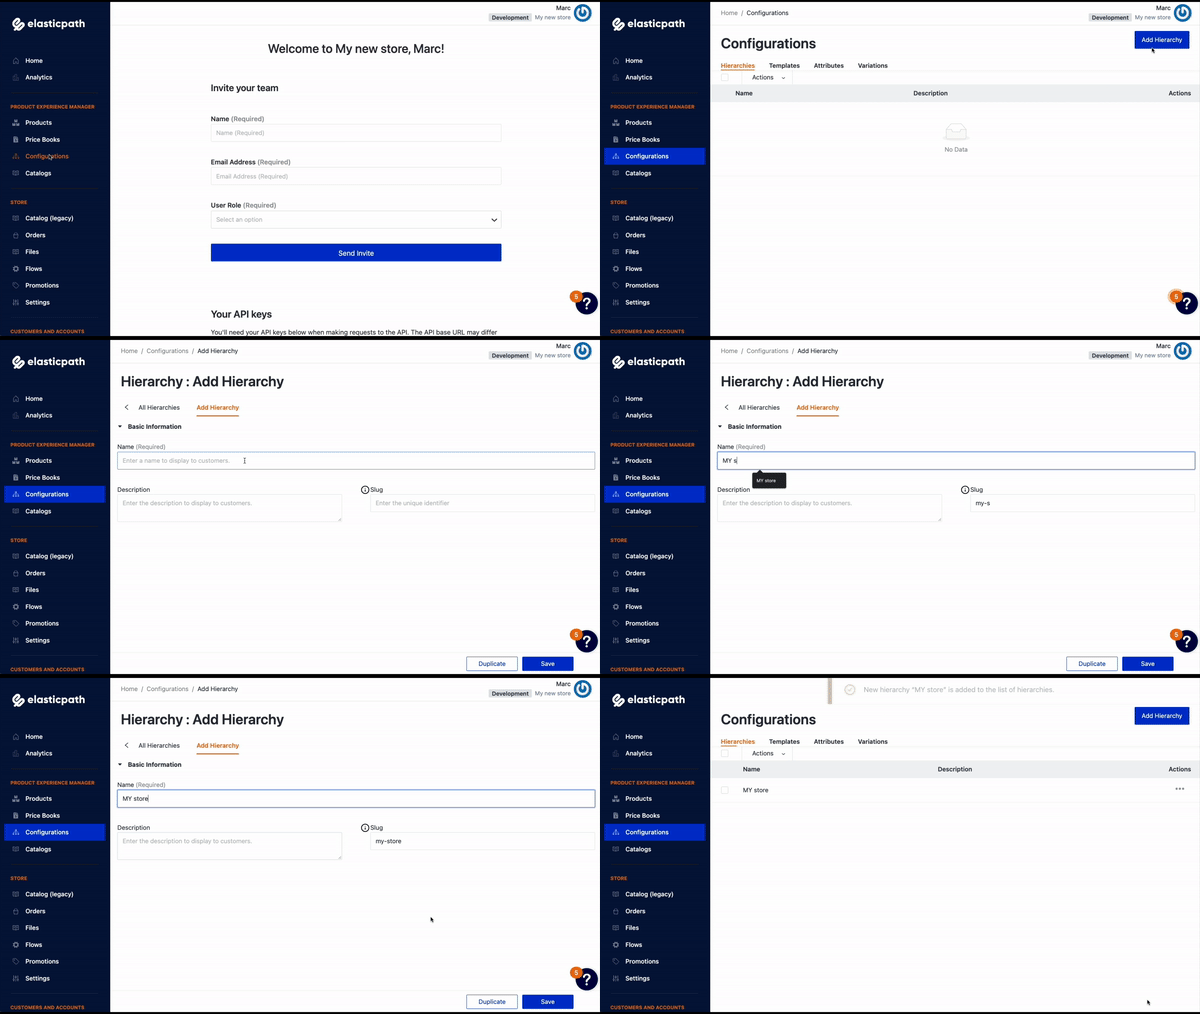
- On the left sidebar, click
Configurations - Click the button
Add Hierarchyon the top of the page - Enter the hierarchy details (name required)
- Click
Save
# Configure
- Click on the hierarchy created in the previous step
- In the section All Nodes, click the button
Create Parent Node - Give it a name (e.g. Technology)
- Click the newly created node (now visible under All Nodes)
- Under Products, click
Add SKUs - Select the items you want to offer under this category by clicking the
+icon - Click the
Savebutton on the bottom of the page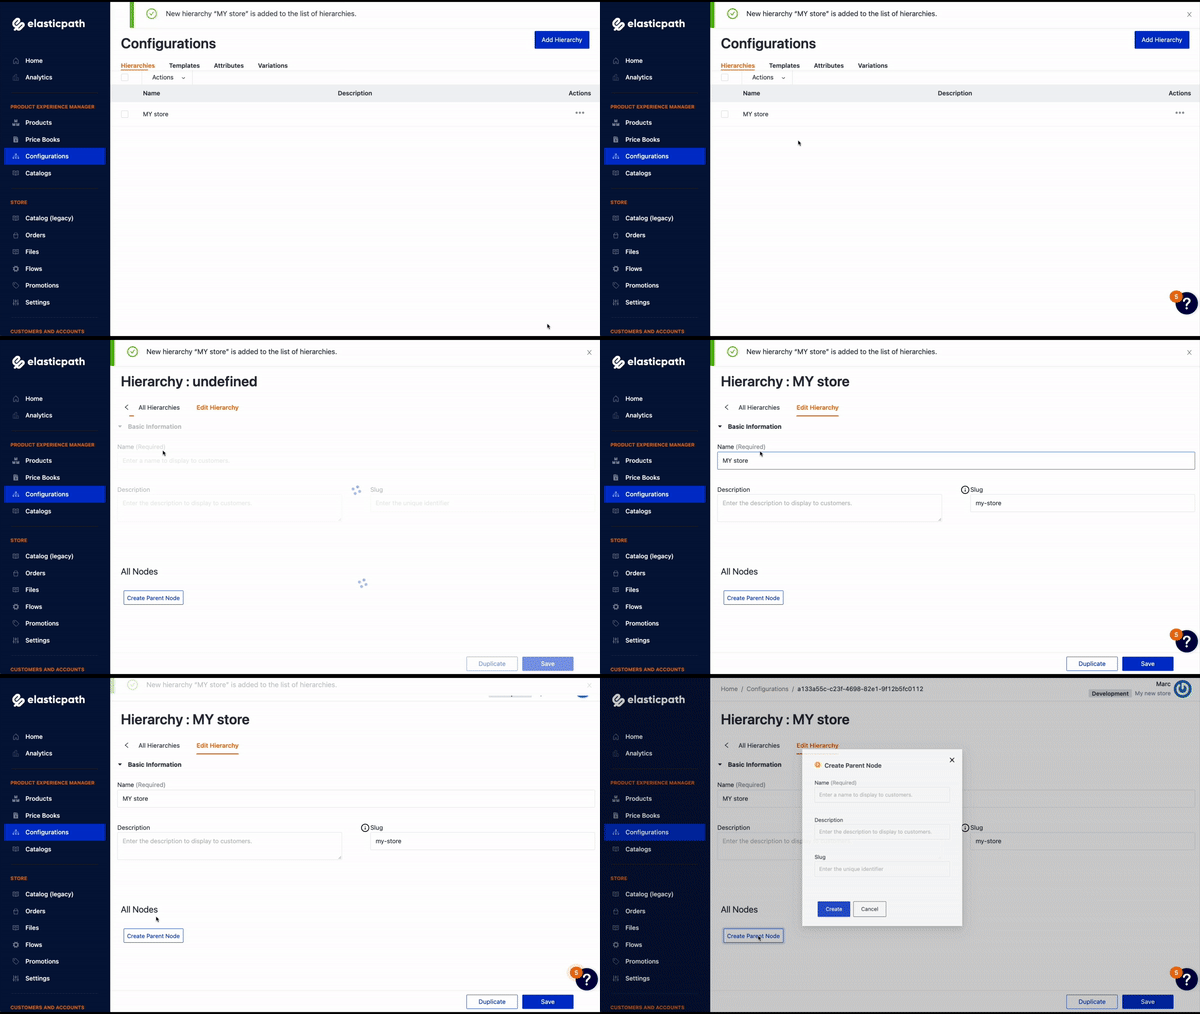
# 5. Create & publish a catalog
# Create
- On the left sidebar, click
Catalogs(NOT Catalog (legacy)!) - Click the button
Add Catalogon the top of the page - Enter a name and description
- Select a price book (created in step 2)
- Select a hierarchy (created in step 4)
- Click the
Savebutton on the bottom of the page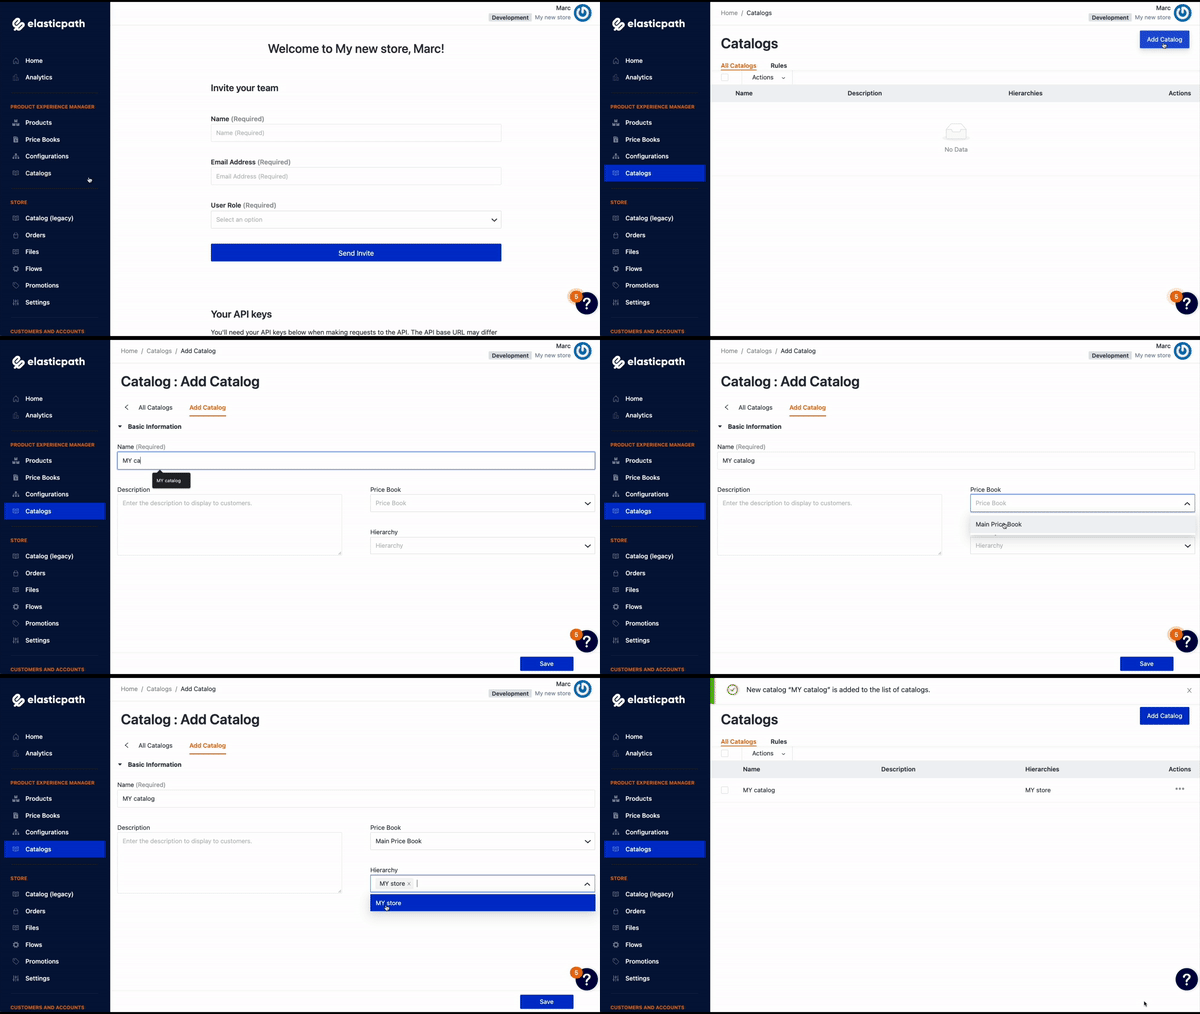
# Publish
ℹ️ This step needs to be made every time something inside the catalog changes (e.g. price of an item)
- On the left sidebar, click
Catalogs(NOT Catalog (legacy)!) - Click the ellipsis icon under Actions of the catalog you want to publish
- Click
Publish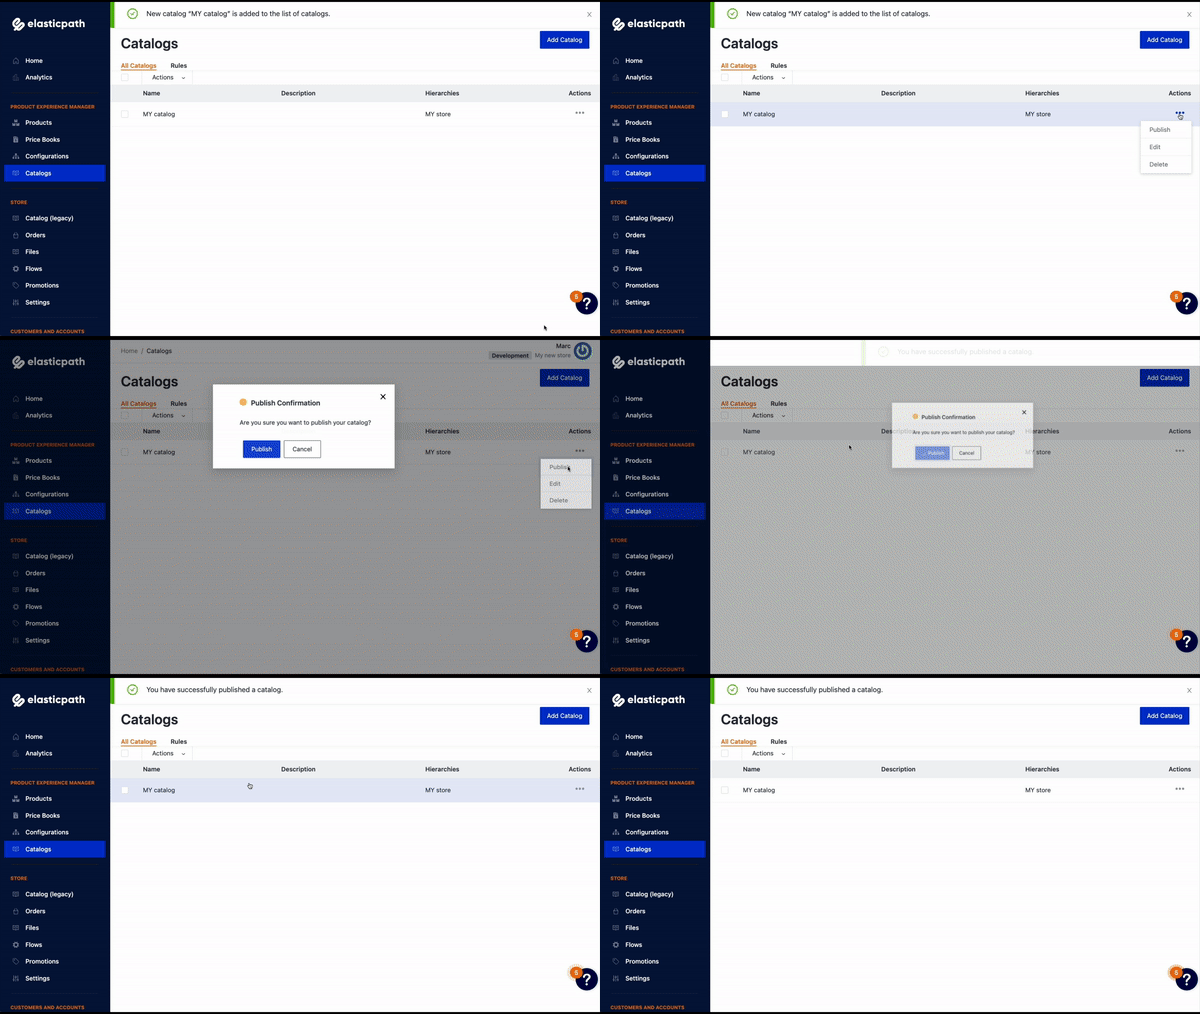
# 6. Enable payment gateway
On the left sidebar, click
SettingsClick the tab
Payment GatewaysClick the payment gateway you'd like to activate (e.g. Manual)
Tick the
EnableboxClick the
Savebutton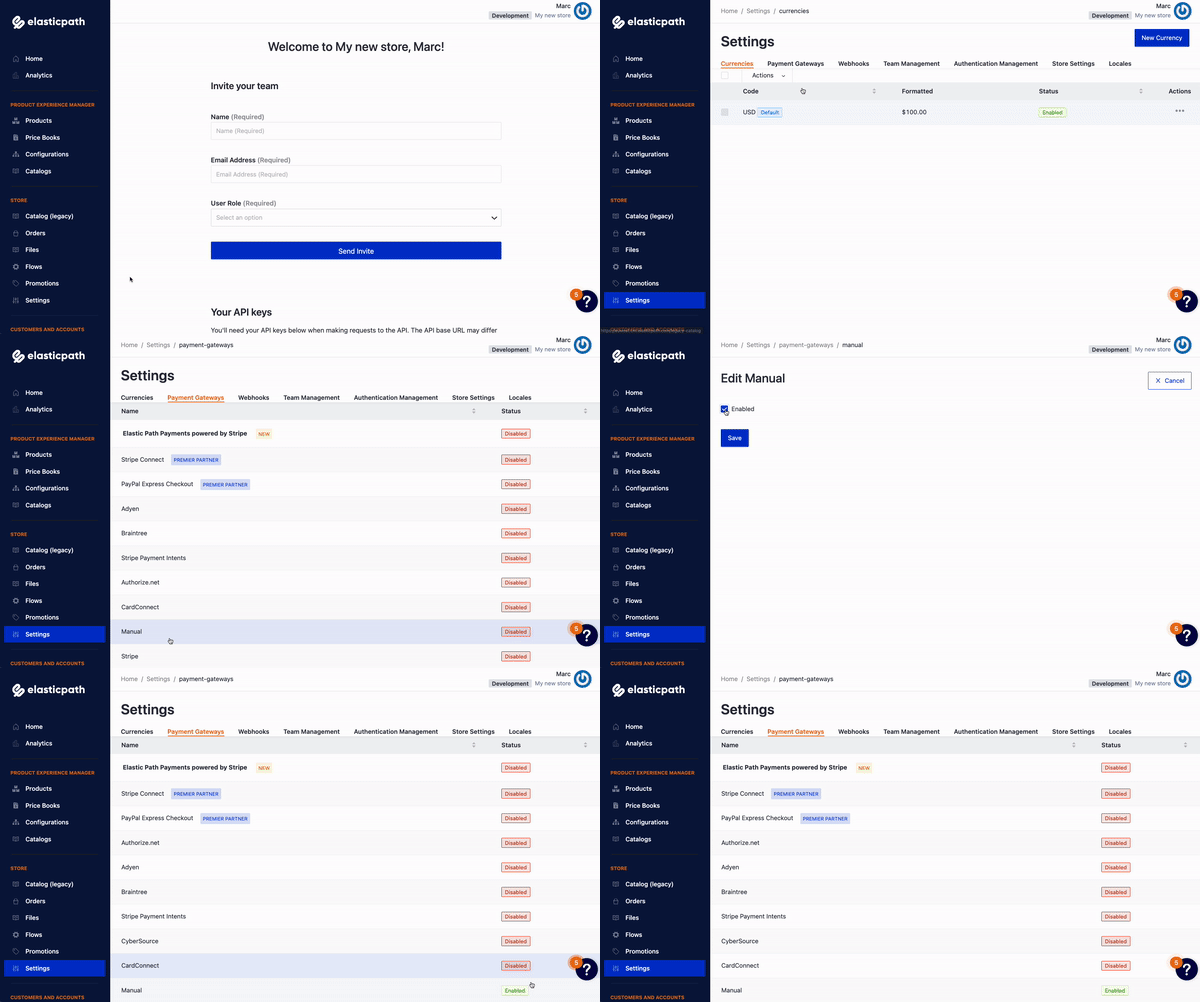
# 7. Setup Elastic Path flows
- Download the Elastic Path integration for Vue Storefront 2
git clone https://github.com/vuestorefront/elasticpath-commerce-cloud/ - Install dependencies and build the Project
yarn && yarn build - Change name file name
packages/theme/.env.exampletopackages/theme/.env - Enter the
EPCC_CLIENT_IDandEPCC_CLIENT_SECRET, retrieved from the credentials - Run the flow generator tool
node packages/theme/cli/bin/run generate - Choose the
Generate all available flows and fieldsoption
# Run the project
- Download the Elastic Path integration for Vue Storefront 2
git clone https://github.com/vuestorefront/elasticpath-commerce-cloud/ - Install dependencies and build the Project
yarn && yarn build - By default, our integration comes with Cloudinary set up as the image provider. However, you can deactivate it by commenting out the following lines in the
packages/theme/nuxt.config.jsfile:image: { // provider: 'cloudinary', // cloudinary: { // baseURL: process.env.NUXT_IMAGE_PROVIDER_BASE_URL, // storagePrefix: process.env.NUXT_IMAGE_PROVIDER_STORAGE_PREFIX, // uploadDir: process.env.NUXT_IMAGE_PROVIDER_UPLOAD_DIR // } }, - Run the project
yarn dev