# Configuring BigCommerce
# Create an API Account
The Vue Storefront integration for BigCommerce requires API Access to communicate with your store. In BigCommerce, API Access is provided through API accounts.
- To create your API Account, first log in to your BigCommerce instance, go to
Settings -> API accounts, and click on the+ Create API Accountbutton.
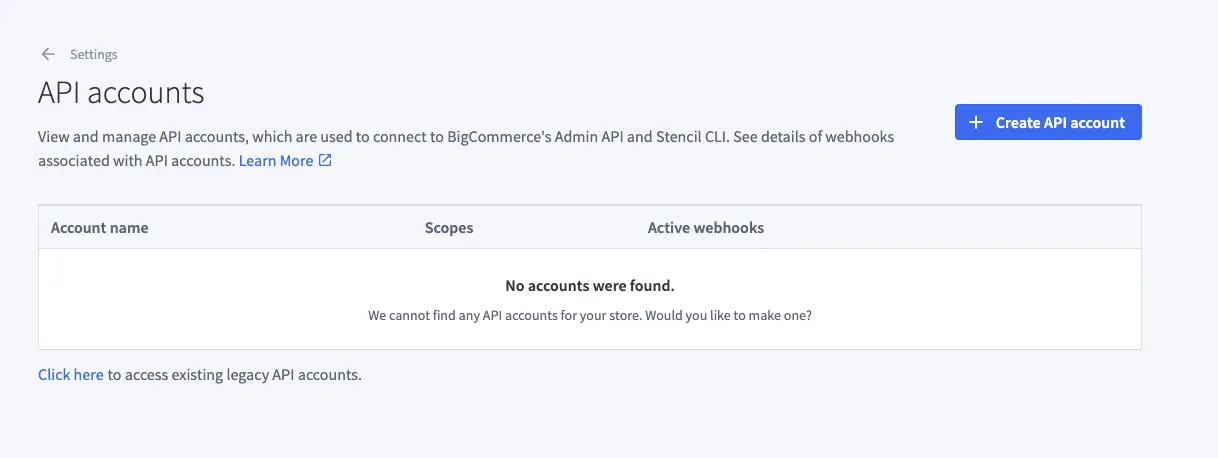
- Use
V2/V3 API tokenasToken type. - Set up your API Account
Name.
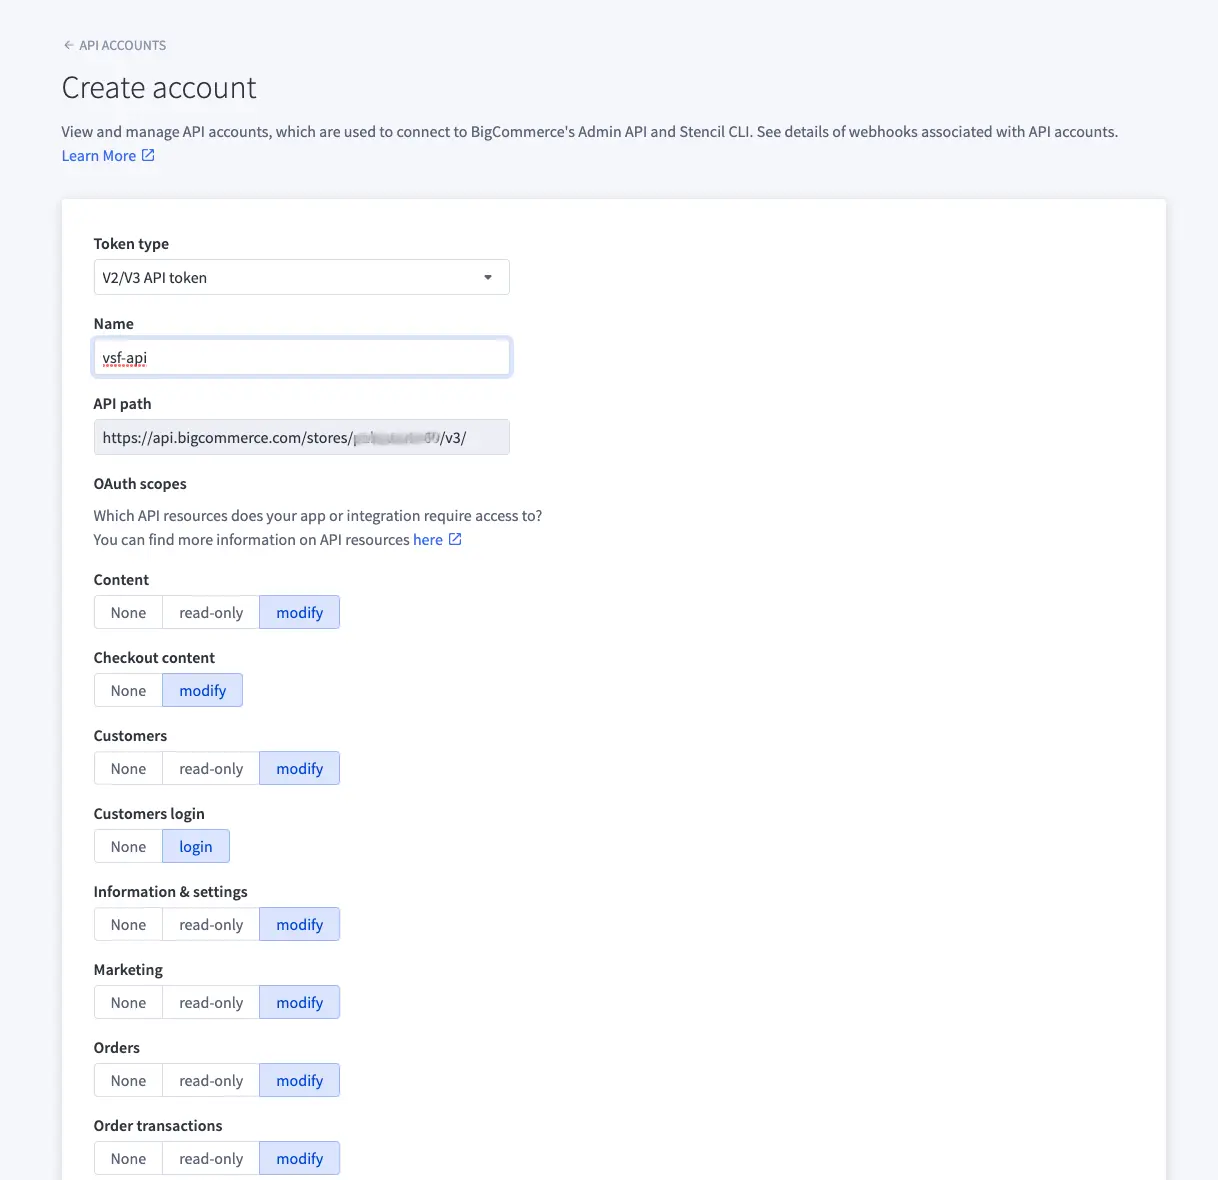
- Copy the
API path. - Add the highest OAuth scopes:
| OAuth Scope | Access level |
|---|---|
| Content | modify |
| Checkout content | modify |
| Customers | modify |
| Customers login | login |
| Information & settings | modify |
| Marketing | modify |
| Orders | modify |
| Order transactions | modify |
| Create payments | create |
| Get payment methods | read-only |
| Stored Payment Instruments | modify |
| Products | modify |
| Themes | modify |
| Carts | modify |
| Checkouts | modify |
| Sites & routes | modify |
| Channel settings | modify |
| Channel listings | modify |
| Storefront API tokens | manage |
| Storefront API customer impersonation tokens | manage |
| Store logs | read-only |
- Save.
- Once the account has been created, a file containing BigCommerce API Credentials should automatically be downloaded. These are the same credentials that appear after creating the API account.
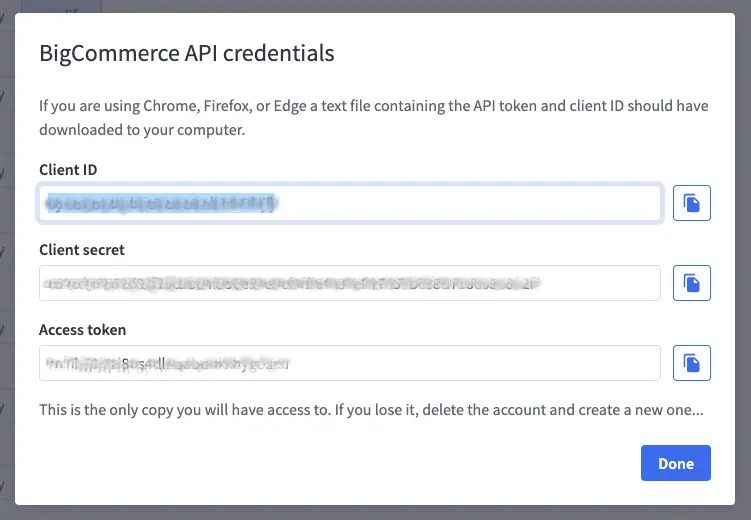
TIP
Values of Client ID, Client secret, Access token and API path will be necessary to configure your VSF app.
# API configuration
The following steps will be referenced from the BigCommerce website. The steps can be done by sending POST request through the command line / Postman, or BigCommerce website itself.
# Create a new Channel
A channel is anywhere a merchant sells their products. This encompasses headless storefronts, marketplaces, POS systems, and marketing platforms. - Channels - BigCommerce Dev Center (opens new window)
The goal of this step is to create a custom channel for our Vue Storefront app. If you're using multiple storefronts, it's necessary to create a custom channel for each storefront.
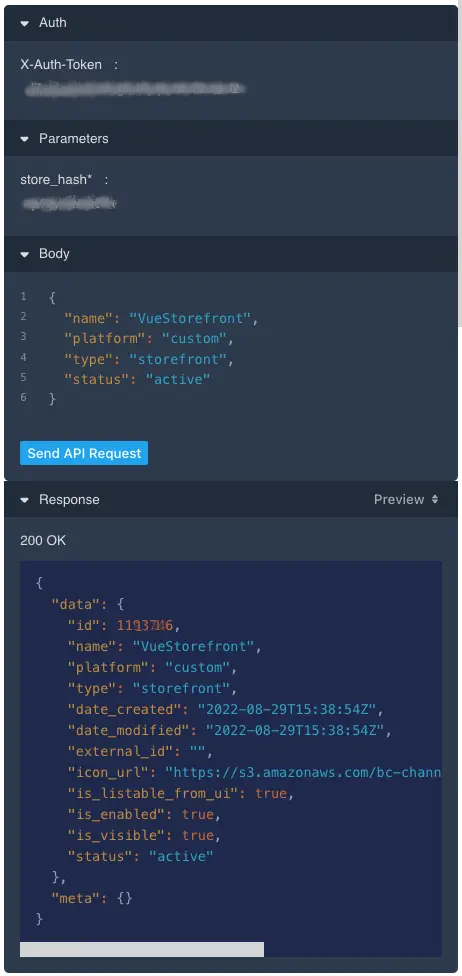
- Open the Create a Channel - API Reference (opens new window) page.
- In the
Authsection, enter yourAccess tokenas theX-Auth-TokenŪ. - Now, you need your
store_hash, it can be found in theAPI pathlink betweenhttps://api.bigcommerce.com/stores/and/v3/. Paste it in theParameterssection asstore_hash. - In
Bodysection, use this JSON to create a custom channel:
{
  "name": "VueStorefront",
  "platform": "custom",
  "type": "storefront",
  "status": "active"
}
- Send API Request.
- You should see
200 OKstatus and information about created channel in theResponsesection. - Channel
idwill be required to create a Create a Channel Site.
# Create a Channel Site
Sites link headless storefronts to sales channels. - Sites - BigCommerce Dev Center (opens new window)
Each of created channels need a site with information about the domain where it will be available.
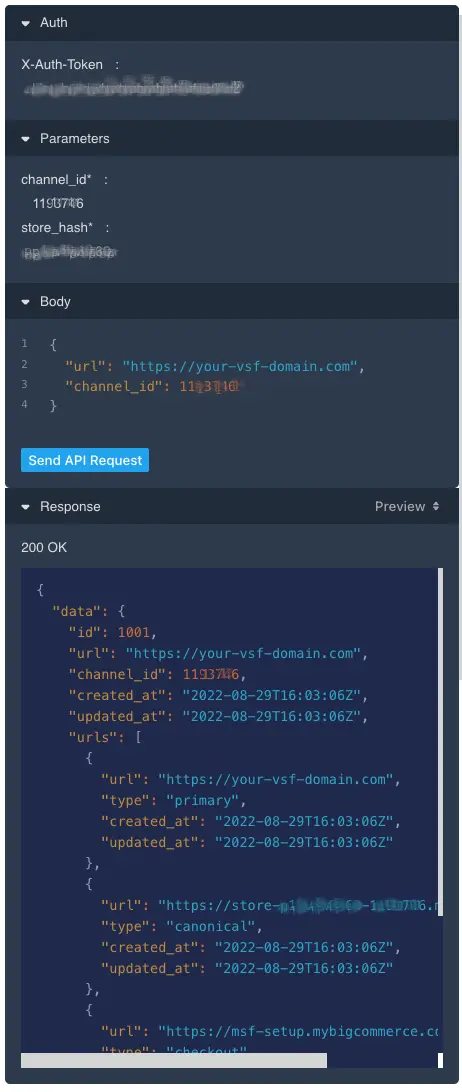
- Open Create a Channel Site (opens new window) page.
- Use your
Access tokeninAuthsection asX-Auth-Token. - Use your
store_hashinParameterssection. - Copy the created channel id and use it as your
channel_idin theParameterssection. - In
Bodysection, use this JSON with your domain information to create a custom channel:
{
  "url": "https://your-vsf-domain.com",
  "channel_id": 1193746
}
Note that the same channel_id appears in both Parameters and Body.
- Send API Request.
- You should see
200 OKstatus and information about created channel site in theResponsesection. - Site
idwill be required to create a Create a Channel Site.
# Create site routes
Site routes tell BigCommerce how to link to pages on a headless storefront. To create a route for a site, send a POST request to /stores/STORE_HASH/v3/sites/{site_id}/routes. - Site routes - BigCommerce Dev Center (opens new window)
Vue Storefront integration with BigCommerce is using a feature called Embedded checkout (opens new window) to generate a BigCommerce checkout in your application. This checkout includes few links (like Edit cart) which navigates to BigCommerce storefront by default. We'd recommend to change that behaviour and navigate to VSF app instead. It can be done with Site routes.
- Open Create a Site Route (opens new window) page.
- In the
Authsection, enter yourAccess tokenas theX-Auth-Token. - Use your
store_hashinParameterssection. - Copy the created site
idand use it assite_idinParameterssection.. - In
Bodysection to create a site route forcart:
{
  "type": "cart",
  "matching": "*",
  "route": "/"
}
- Repeat the same steps for
home:
{
  "type": "home",
  "matching": "*",
  "route": "/"
}
- Repeat the same steps for
create_account:
{
  "type": "create_account",
  "matching": "*",
  "route": "/"
}
- Repeat the same steps for
forgot_password:
{
  "type": "forgot_password",
  "matching": "*",
  "route": "/"
}
- It's ready. Now, redirects from embedded checkout will point user to Vue Storefront application instead of BigCommerce storefront.
# Add Categories to your channel
- Open Upsert Category Trees (opens new window) page.
- Click on
Try ita modal should appear - Use your
Access tokenin request profile asAccess Token - Use your
store_hashin request profile asStore Hash - Copy the created channel id and use it as your channel inside the
channelsarray for the request body
example using 12345678 as your Channel ID
[
  {
    "name": "custom channel tree", // You can put any name you want here
    "channels": [
      12345678
    ]
  }
]
Take note that 1 category tree is allowed to 1 channel only.
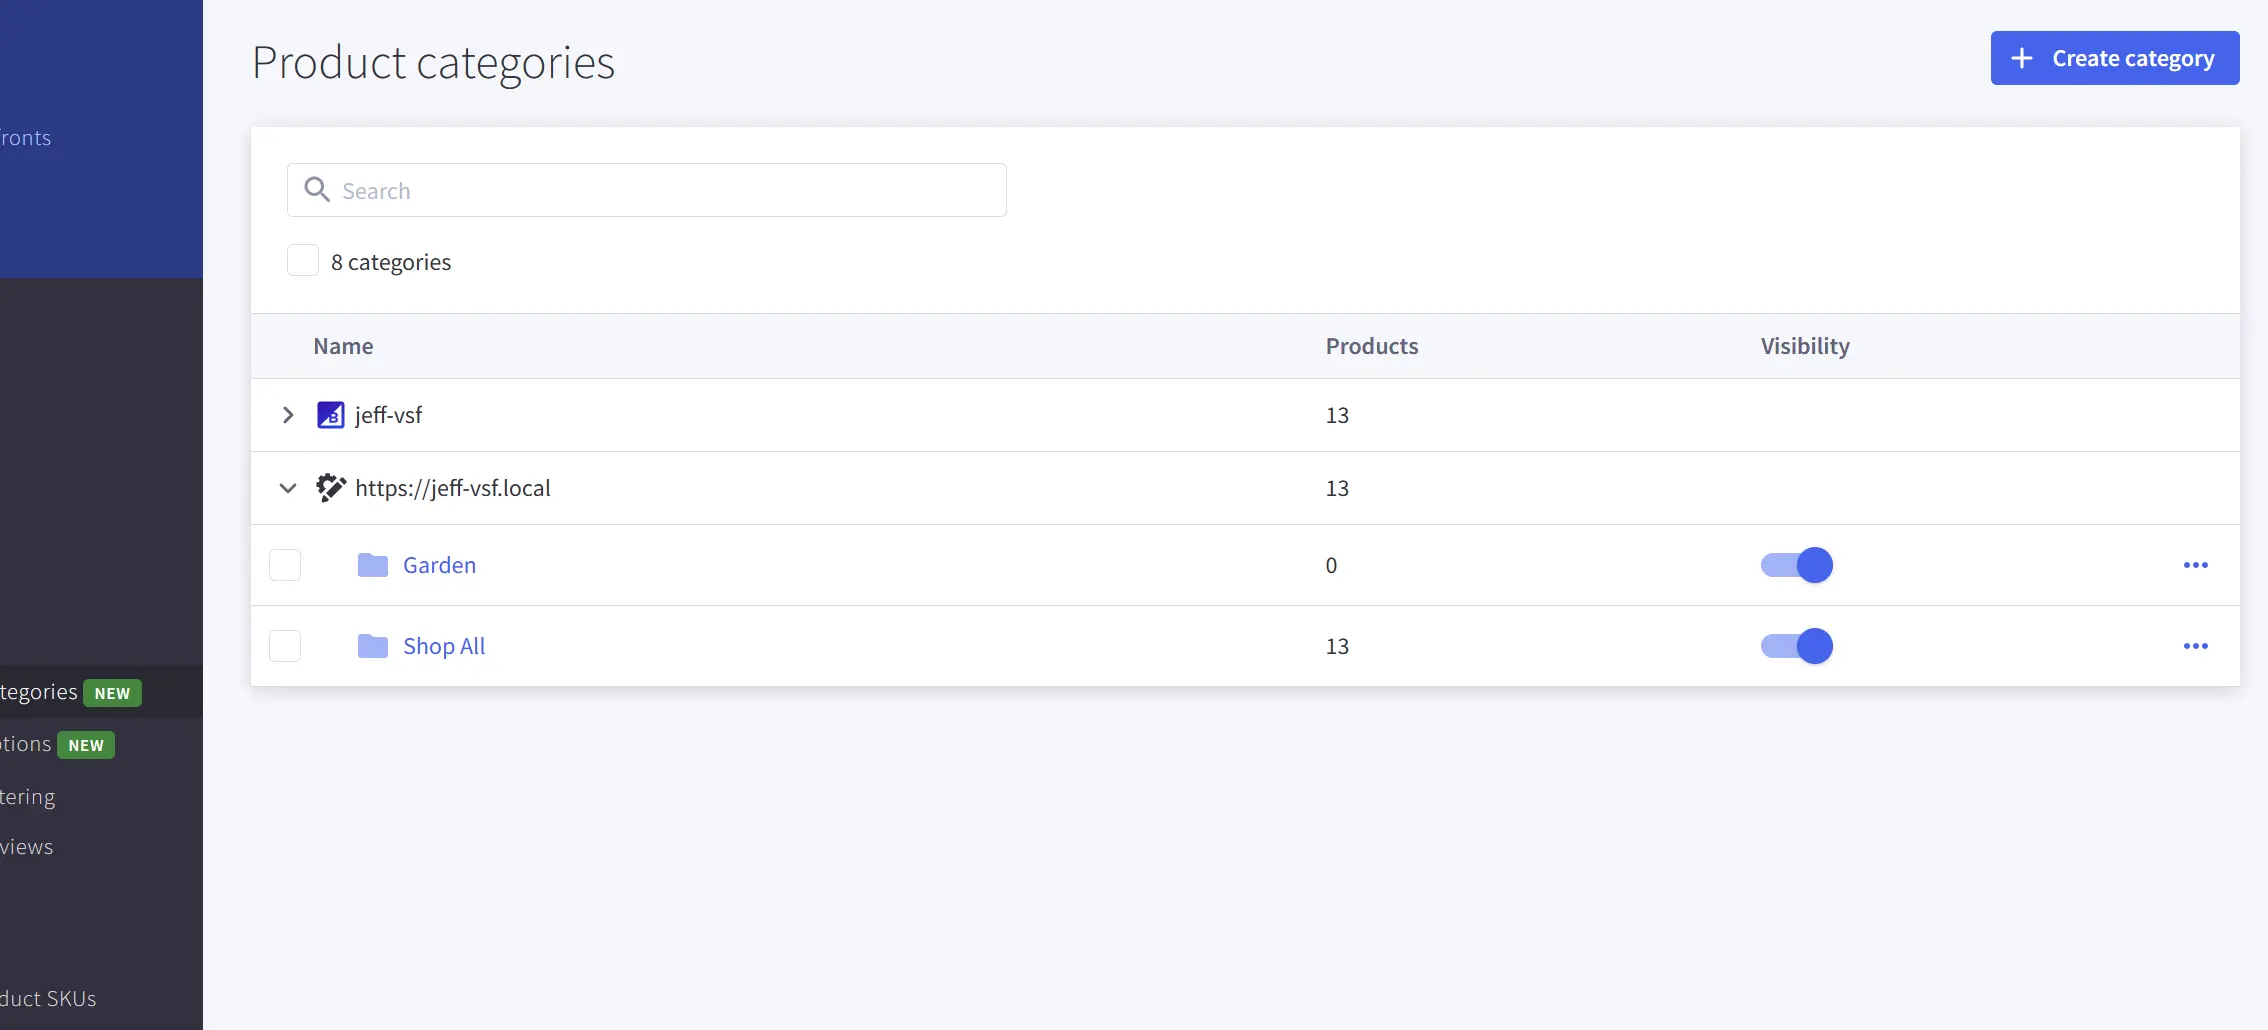
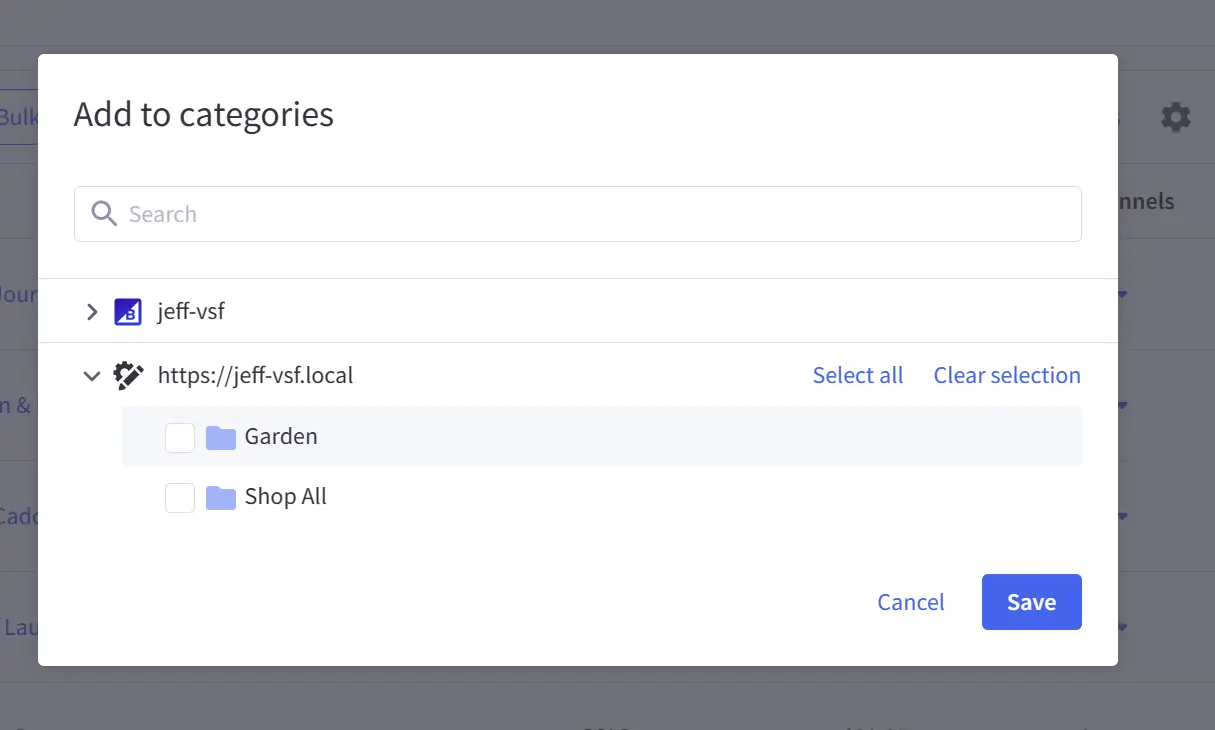
- Head over to https://<store_hash>.mybigcommerce.com/manage/products/categories (opens new window) and create your categories for your custom channel
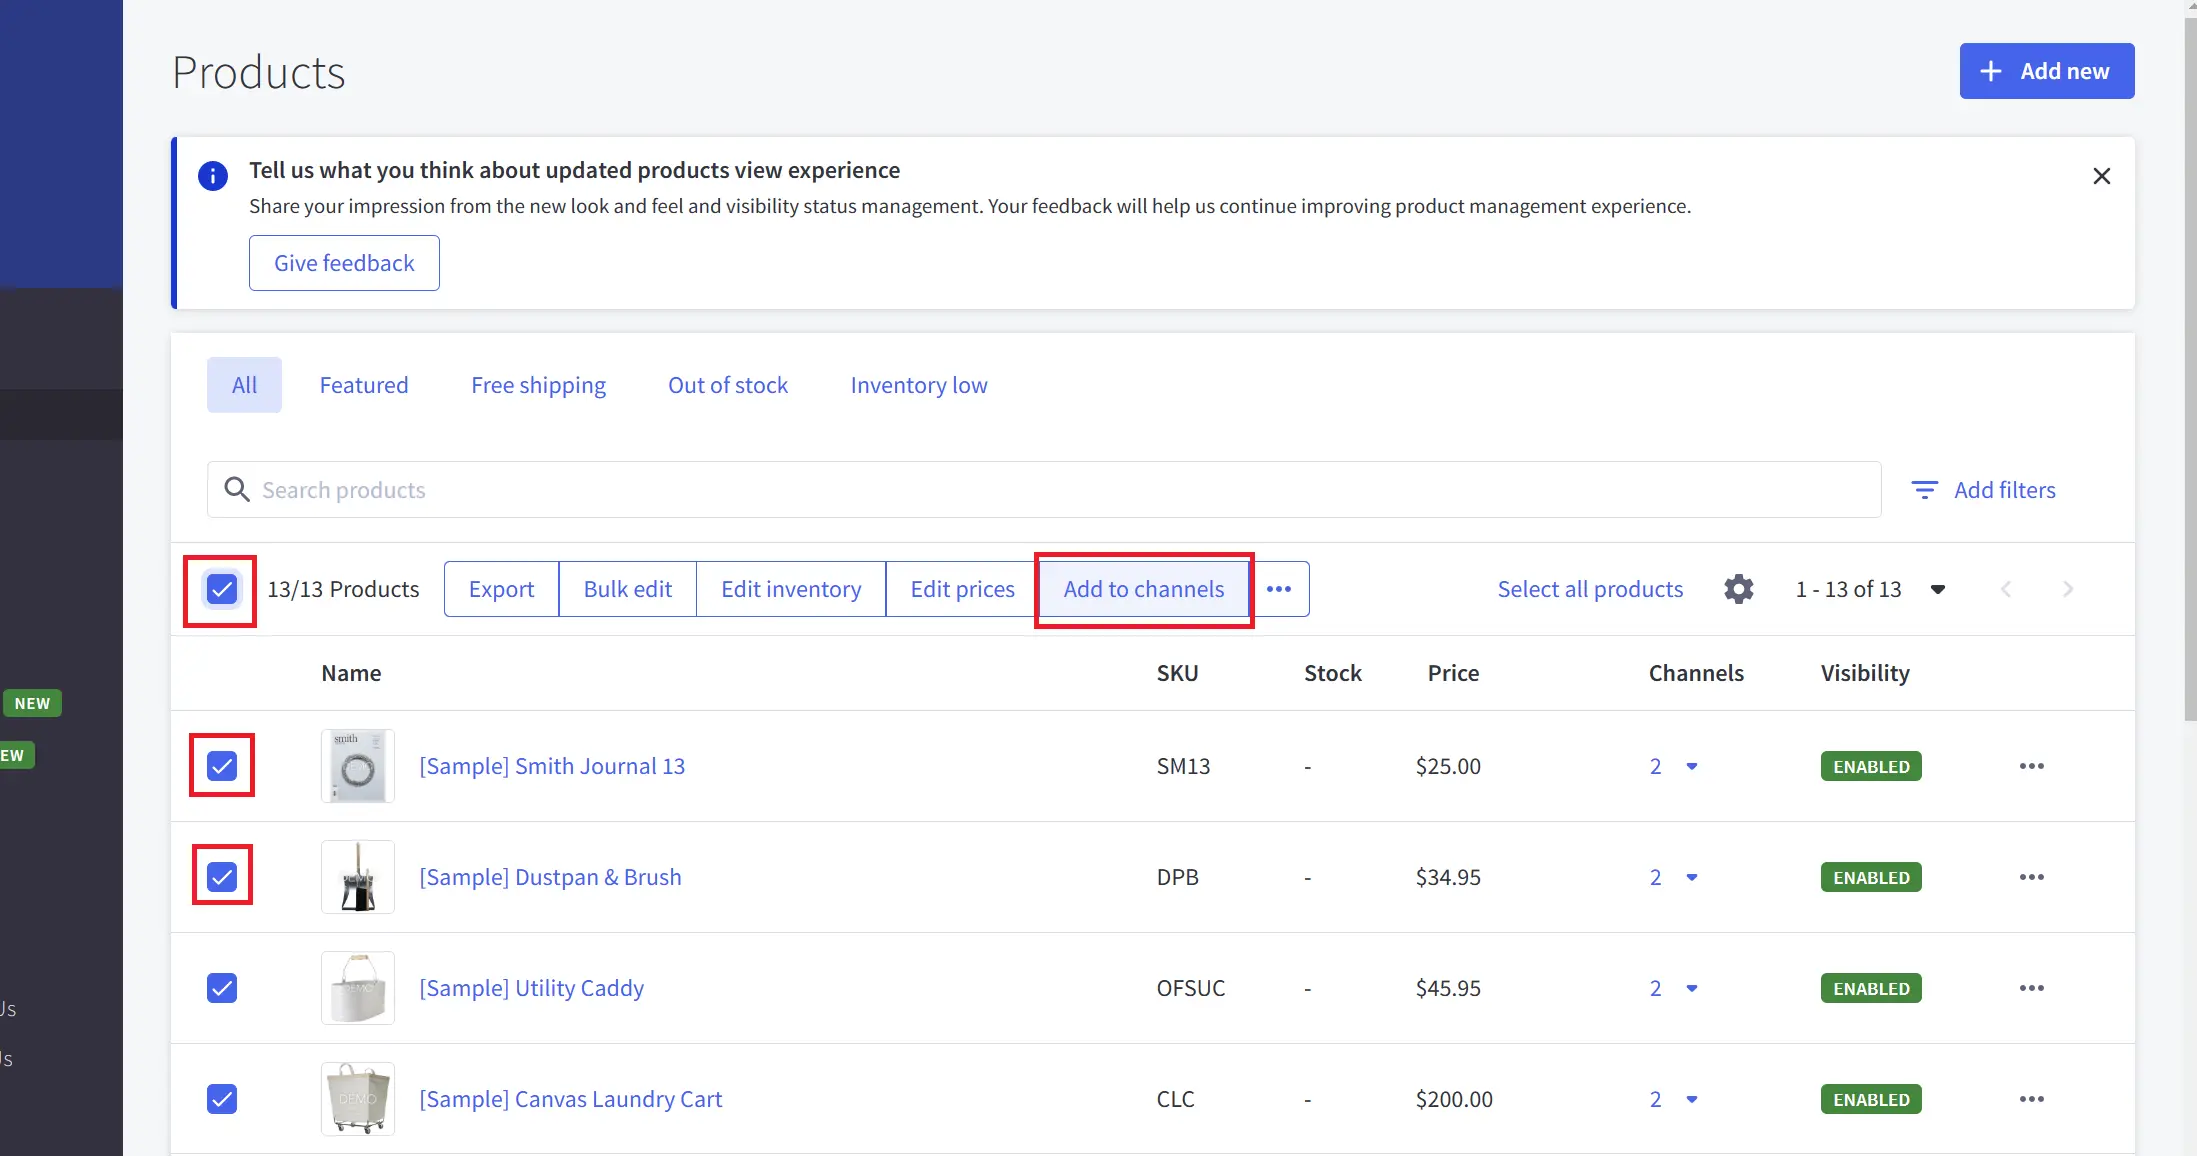
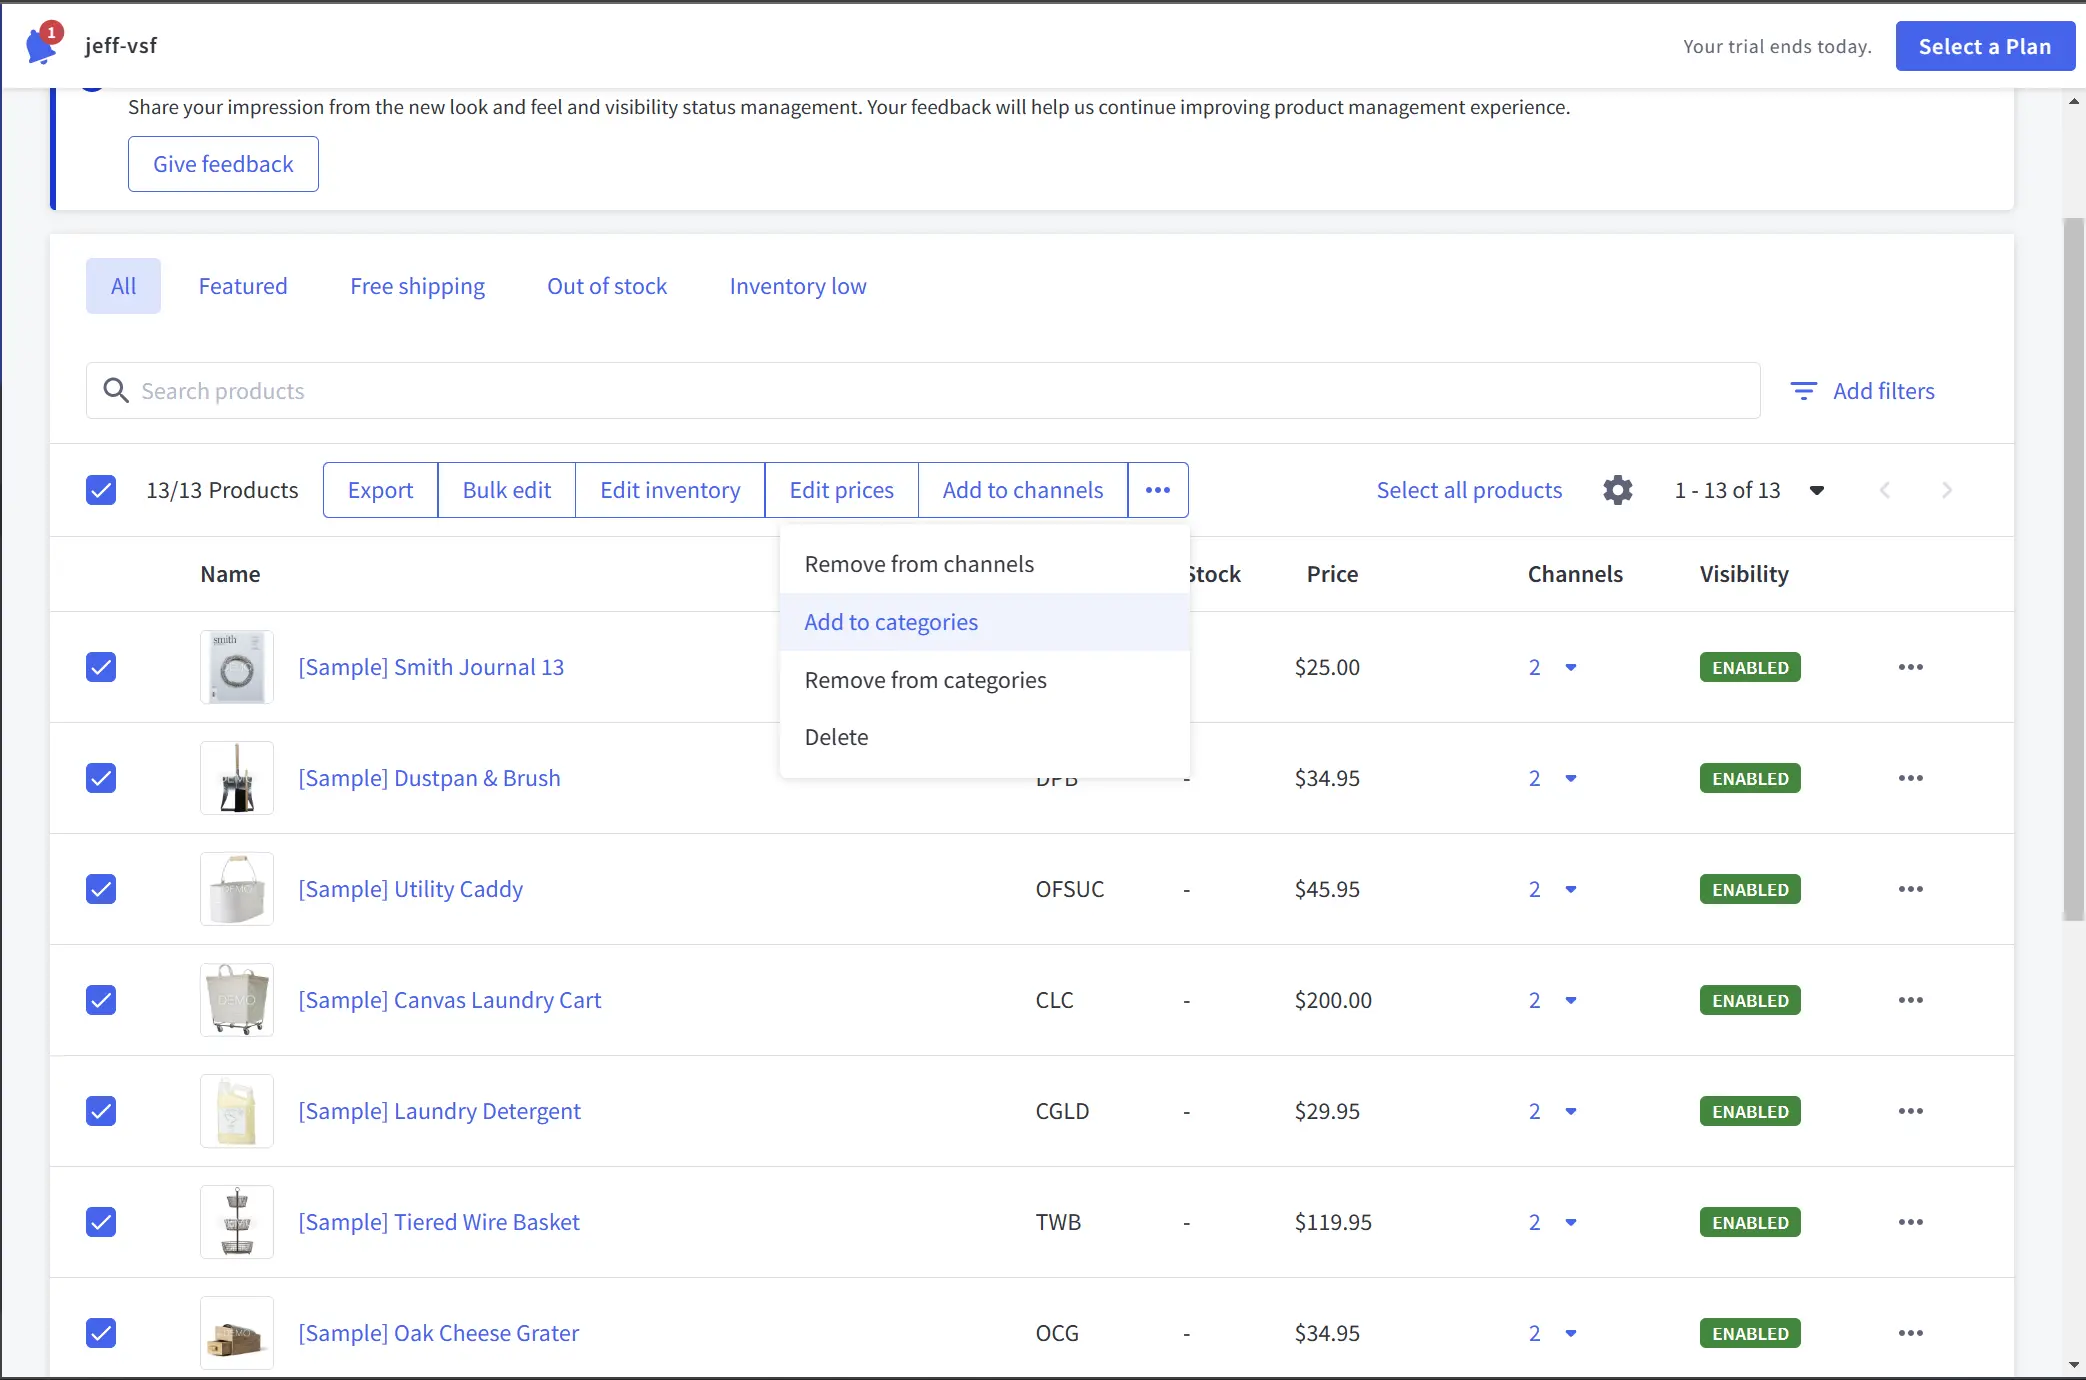
- Head over to https://<store_hash>.mybigcommerce.com/manage/products (opens new window) and assign your products to your custom channel and to categories
# Create a custom Cart ID field on Customers entity
Creating a Cart ID field on Customers entity enables using customer cart across different devices and sessions.
- In BigCommerce management panel, navigate to
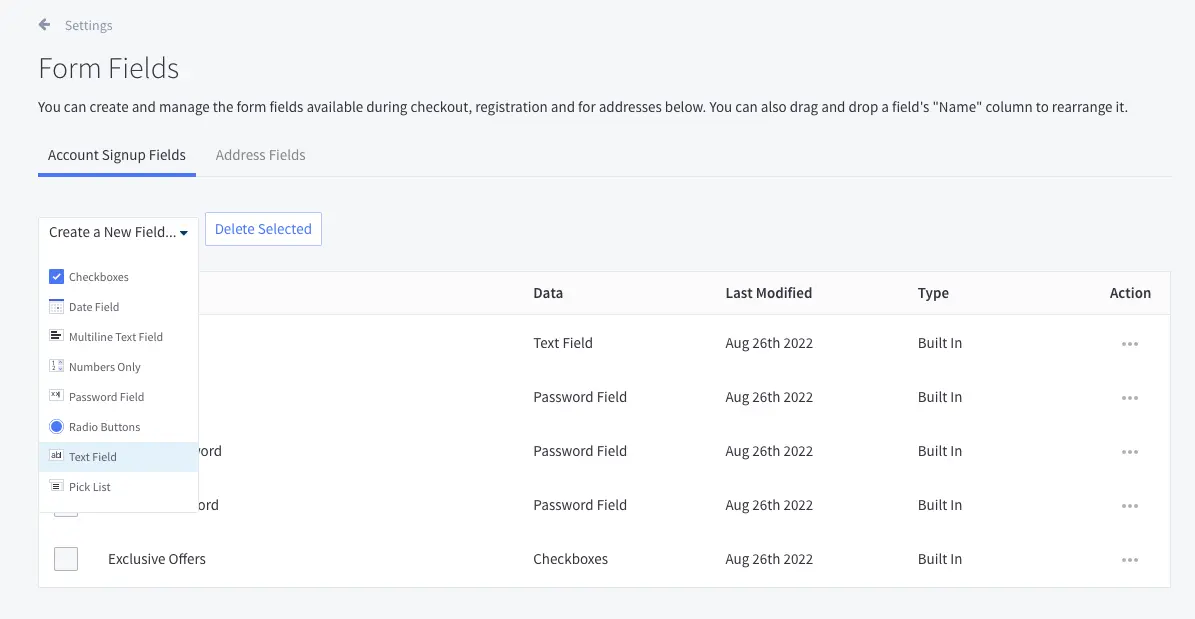
Settings -> Account sign up form. - Select
Text FieldinCreate a New Field...dropdown.
- Use
Cart IDasField Name. No other value is required to be set.
- Save.
# Configure Content-Security-Policy Header
To render embedded checkout in your Vue Storefront application, you need to configure CSP header with information about a trusted domain where it can be used.
- Navigate to
Settings -> Security & Privacy. - Scroll to
Storefrontsection. - Select
Specify my own CSP headeroption inConfigure Content-Security-Policy Header Valuefield. - Use
frame-ancestors https://your-vsf-domain.comwith your domain information.

TIP
If you have more than one storefront, you can add them separated with spaces or use a wildcard. Example: frame-ancestors https://store1.your-vsf-domain.com https://store2.your-vsf-domain.com or frame-ancestors https://*.your-vsf-domain.com.
# Guest token
Guest token is required for proper working of API calls of unauthorized user. To retrieve guest token:
- Navigate to the
Homein BigCommerce management panel. - Find
Review & test your storeblock. - Copy the
preview code. This is the guest token.
- This token will be necessary during setup of Vue Storefront app.
# Make your store active
To avoid problems with logging in and embedding the checkout, you need to make your store active.
- Navigate to
Channel Manager. - Find the default BigCommerce storefront (the one with BigCommerce logo next to it).
- Press on
...button and selectMake active.

- Verify that this storefront has the
Activelabel.