Build Product Details Page with Storefront UI
Every eCommerce application needs appealing, fast and responsive UI to attract and retain customers. With Storefront UI building one is easy and fast! In this guide, let's learn how to build a Product Details page. We will learn how to use Storefront UI components, blocks and of course how to customise them.
Already familiar with Storefront UI? You can skip this section and jump to Connecting Product Details Page with SAP Commerce Cloud. You can find the code for this guide in the nextjs-starter/product-page branch
Installing Storefront UI
First, in order to use Storefront UI we need to install and configure it. Luckily, it's very easy to do.
Install Storefront UI
In the storefront directory, install Storefront UI by running the following command:
npm i @storefront-ui/react
npm i -D tailwindcss@3 postcss autoprefixer
This will install Storefront UI package for React based applications and Tailwind CSS with PostCSS and Autoprefixer.
Next, initialize Tailwind CSS by running the following command:
npx tailwindcss@3 init -pAll set! Now, let's configure Storefront UI.
Configure Storefront UI
In the storefront directory, rename the tailwind.config.js file to tailwind.config.ts and update the file with the following content:
const { tailwindConfig } = require('@storefront-ui/react/tailwind-config');

/** @type {import('tailwindcss').Config} */
module.exports = {
  presets: [tailwindConfig],
  content: [
    './app/**/*.{js,ts,jsx,tsx}',
    './components/**/*.{js,ts,jsx,tsx}',
    '../../node_modules/@storefront-ui/react/**/*.{js,mjs}',
  ],
  theme: {
    extend: {},
  },
  plugins: [],
};
This will configure Tailwind CSS to work with Next.js App Router file structure and Storefront UI. This also means that only the Tailwind classes from the Storefront UI components you use will end up in your final CSS.
Add Tailwind CSS to the Project
In the app/globals.css file, add the following code:
@tailwind base;
@tailwind components;
@tailwind utilities;
First Storefront UI Component
Now, let's use the first Storefront UI component in the app/page.tsx file. Add the following code to the file:
import { getSdk } from "@/sdk/sdk";
+ import { SfButton } from "@storefront-ui/react";

const sdk = getSdk();

export default async function Page() {
  const {
    data: { products },
  } = await sdk.sapcc.getProducts({});

  return (
    <div>
+      <div>
+        <SfButton>Click me</SfButton>
+      </div>
      Product List:
      <ul>
        {products?.map((product) => <li key={product.code}>{product.name}</li>)}
      </ul>
    </div>
  );
}
This will import the SfButton component from Storefront UI. Here's how the result should look like:

Great! Now, let's build the Product Details page with Storefront UI.
Building Product Details Page
Storefront UI is a very versatile library that provides a lot of components and blocks to build a modern eCommerce application. In this guide, we will build a Product Details page using Storefront UI components and blocks.
First, let's visit Storefront UI documentation to see what components and blocks are available. You can find the SFUI Documentation here.
Storefront UI provides two type of components: Base Components and Blocks. Base Components are the basic building blocks of the UI and Blocks are the pre-built components that can be used to build a page. Blocks are made up of Base Components. Blocks are very useful to build a page quickly and easily without writing a lot of code. This is exactly what we need to build a Product Details page.
Product Details Page Blocks
To build the Product Details we will use the following Storefront UI Blocks:
Let's start building the page!
Product Details Page
Storefront UI is not like most traditional UI libraries. Blocks are too complex to be used directly imported from the library. It would be very difficult and time consuming to customize them. So, instead, Storefront UI provides Blocks that can be copied and pasted into the project and then customized. Since all of the source code is available directly to you, including any styles - you have full control to change the styling.
First, let's create new files for the Product Details page. In the storefront directory, create a new directory called components and inside it create a new file called ProductDetails.tsx. Add the code from the Product Details Code tab to the file:
import {
  SfRating,
  SfButton,
  SfLink,
  SfCounter,
  SfIconShoppingCart,
  SfIconCompareArrows,
  SfIconFavorite,
  SfIconSell,
  SfIconPackage,
  SfIconRemove,
  SfIconAdd,
  SfIconWarehouse,
  SfIconSafetyCheck,
  SfIconShoppingCartCheckout,
} from '@storefront-ui/react';
import { useCounter } from 'react-use';
import { useId, ChangeEvent } from 'react';
import { clamp } from '@storefront-ui/shared';

export default function ProductDetails() {
  const inputId = useId();
  const min = 1;
  const max = 999;
  const [value, { inc, dec, set }] = useCounter(min);
  function handleOnChange(event: ChangeEvent<HTMLInputElement>) {
    const { value: currentValue } = event.target;
    const nextValue = parseFloat(currentValue);
    set(Number(clamp(nextValue, min, max)));
  }
  return (
    <section className="md:max-w-[640px]">
      <div className="inline-flex items-center justify-center text-sm font-medium text-white bg-secondary-600 py-1.5 px-3 mb-4">
        <SfIconSell size="sm" className="mr-1.5" />
        Sale
      </div>
      <h1 className="mb-1 font-bold typography-headline-4">
        Mini Foldable Drone with HD Camera FPV Wifi RC Quadcopter
      </h1>
      <strong className="block font-bold typography-headline-3">$2,345.99</strong>
      <div className="inline-flex items-center mt-4 mb-2">
        <SfRating size="xs" value={3} max={5} />
        <SfCounter className="ml-1" size="xs">
          123
        </SfCounter>
        <SfLink href="#" variant="secondary" className="ml-2 text-xs text-neutral-500">
          123 reviews
        </SfLink>
      </div>
      <ul className="mb-4 font-normal typography-text-sm">
        <li>HD Pictures & Videos and FPV Function</li>
        <li>Intelligent Voice Control</li>
        <li>Multiple Fun Flights</li>
        <li>Easy to Use</li>
        <li>Foldable Design & Double Flight Time</li>
      </ul>
      <div className="py-4 mb-4 border-gray-200 border-y">
        <div className="bg-primary-100 text-primary-700 flex justify-center gap-1.5 py-1.5 typography-text-sm items-center mb-4 rounded-md">
          <SfIconShoppingCartCheckout />1 in cart
        </div>
        <div className="items-start xs:flex">
          <div className="flex flex-col items-stretch xs:items-center xs:inline-flex">
            <div className="flex border border-neutral-300 rounded-md">
              <SfButton
                variant="tertiary"
                square
                className="rounded-r-none p-3"
                disabled={value <= min}
                aria-controls={inputId}
                aria-label="Decrease value"
                onClick={() => dec()}
              >
                <SfIconRemove />
              </SfButton>
              <input
                id={inputId}
                type="number"
                role="spinbutton"
                className="grow appearance-none mx-2 w-8 text-center bg-transparent font-medium [&::-webkit-inner-spin-button]:appearance-none [&::-webkit-inner-spin-button]:display-none [&::-webkit-inner-spin-button]:m-0 [&::-webkit-outer-spin-button]:display-none [&::-webkit-outer-spin-button]:m-0 [-moz-appearance:textfield] [&::-webkit-outer-spin-button]:appearance-none disabled:placeholder-disabled-900 focus-visible:outline focus-visible:outline-offset focus-visible:rounded-sm"
                min={min}
                max={max}
                value={value}
                onChange={handleOnChange}
              />
              <SfButton
                variant="tertiary"
                square
                className="rounded-l-none p-3"
                disabled={value >= max}
                aria-controls={inputId}
                aria-label="Increase value"
                onClick={() => inc()}
              >
                <SfIconAdd />
              </SfButton>
            </div>
            <p className="self-center mt-1 mb-4 text-xs text-neutral-500 xs:mb-0">
              <strong className="text-neutral-900">{max}</strong> in stock
            </p>
          </div>
          <SfButton size="lg" className="w-full xs:ml-4" slotPrefix={<SfIconShoppingCart size="sm" />}>
            Add to cart
          </SfButton>
        </div>
        <div className="flex justify-center mt-4 gap-x-4">
          <SfButton size="sm" variant="tertiary" slotPrefix={<SfIconCompareArrows size="sm" />}>
            Compare
          </SfButton>
          <SfButton size="sm" variant="tertiary" slotPrefix={<SfIconFavorite size="sm" />}>
            Add to list
          </SfButton>
        </div>
      </div>
      <div className="flex first:mt-4">
        <SfIconPackage size="sm" className="flex-shrink-0 mr-1 text-neutral-500" />
        <p className="text-sm">
          Free shipping, arrives by Thu, Apr 7. Want it faster?
          <SfLink href="#" variant="secondary" className="mx-1">
            Add an address
          </SfLink>
          to see options
        </p>
      </div>
      <div className="flex mt-4">
        <SfIconWarehouse size="sm" className="flex-shrink-0 mr-1 text-neutral-500" />
        <p className="text-sm">
          Pickup not available at your shop.
          <SfLink href="#" variant="secondary" className="ml-1">
            Check availability nearby
          </SfLink>
        </p>
      </div>
      <div className="flex mt-4">
        <SfIconSafetyCheck size="sm" className="flex-shrink-0 mr-1 text-neutral-500" />
        <p className="text-sm">
          Free 30-days returns.
          <SfLink href="#" variant="secondary" className="ml-1">
            Details
          </SfLink>
        </p>
      </div>
    </section>
  );
}
Next, repeat the same process for the Product Gallery with Vertical Thumbnails and Product Slider blocks. Create new files called ProductGallery.tsx and ProductSlider.tsx and add the code from the Code tab to the files.
In order to keep the guide short, we will not include the code for all the blocks here. You can find the code in the documentation and in the nextjs-starter/product-page branch.
Now, let's finally use the Storefront UI Blocks to build a page.
Create app/product/[id]/page.tsx file with the following code:
"use client";

import ProductDetails from "@/components/ProductDetails";
import ProductGallery from "@/components/ProductGallery";
import ProductSlider from "@/components/ProductSlider";

export default function Page() {
  return (
    <div>
      <ProductGallery />
      <ProductDetails />
      <ProductSlider />
    </div>
  );
}
You may have noticed that we are using the "use client" directive at the top of the file. This is done to simplify the guide. In a real application, you would need to add "use client" directive on each SFUI Blocks files, since they are using a lot of client side interactions.
Open http://localhost:3000/product/123 Here's how the result should look like:

It's ugly, right? That's because we haven't added any styles to the page. Since Storefront UI uses Tailwind CSS under the hood, we will be using it to add styles to the page. You can find the Tailwind CSS documentation here.
Let's add some styles to the page! In the app/product/[id]/page.tsx file, add the following code:
//... imports

export default function Page() {
  return (
    <div
      className="flex flex-col gap-8 md:gap-12 lg:gap-16 max-w-screen-xl m-auto px-4 md:px-8 lg:px-12 xl:px-16 py-8 md:py-12 lg:py-16 xl:py-20"
    >
      <section
        className="flex flex-col items-start gap-8 md:flex-row md:gap-4 xl:gap-6"
      >
        <ProductGallery />
        <ProductDetails />
      </section>
      <ProductSlider />
    </div>
  )
}

//...
This will add some basic styles to the page. Here's how the result should look like:
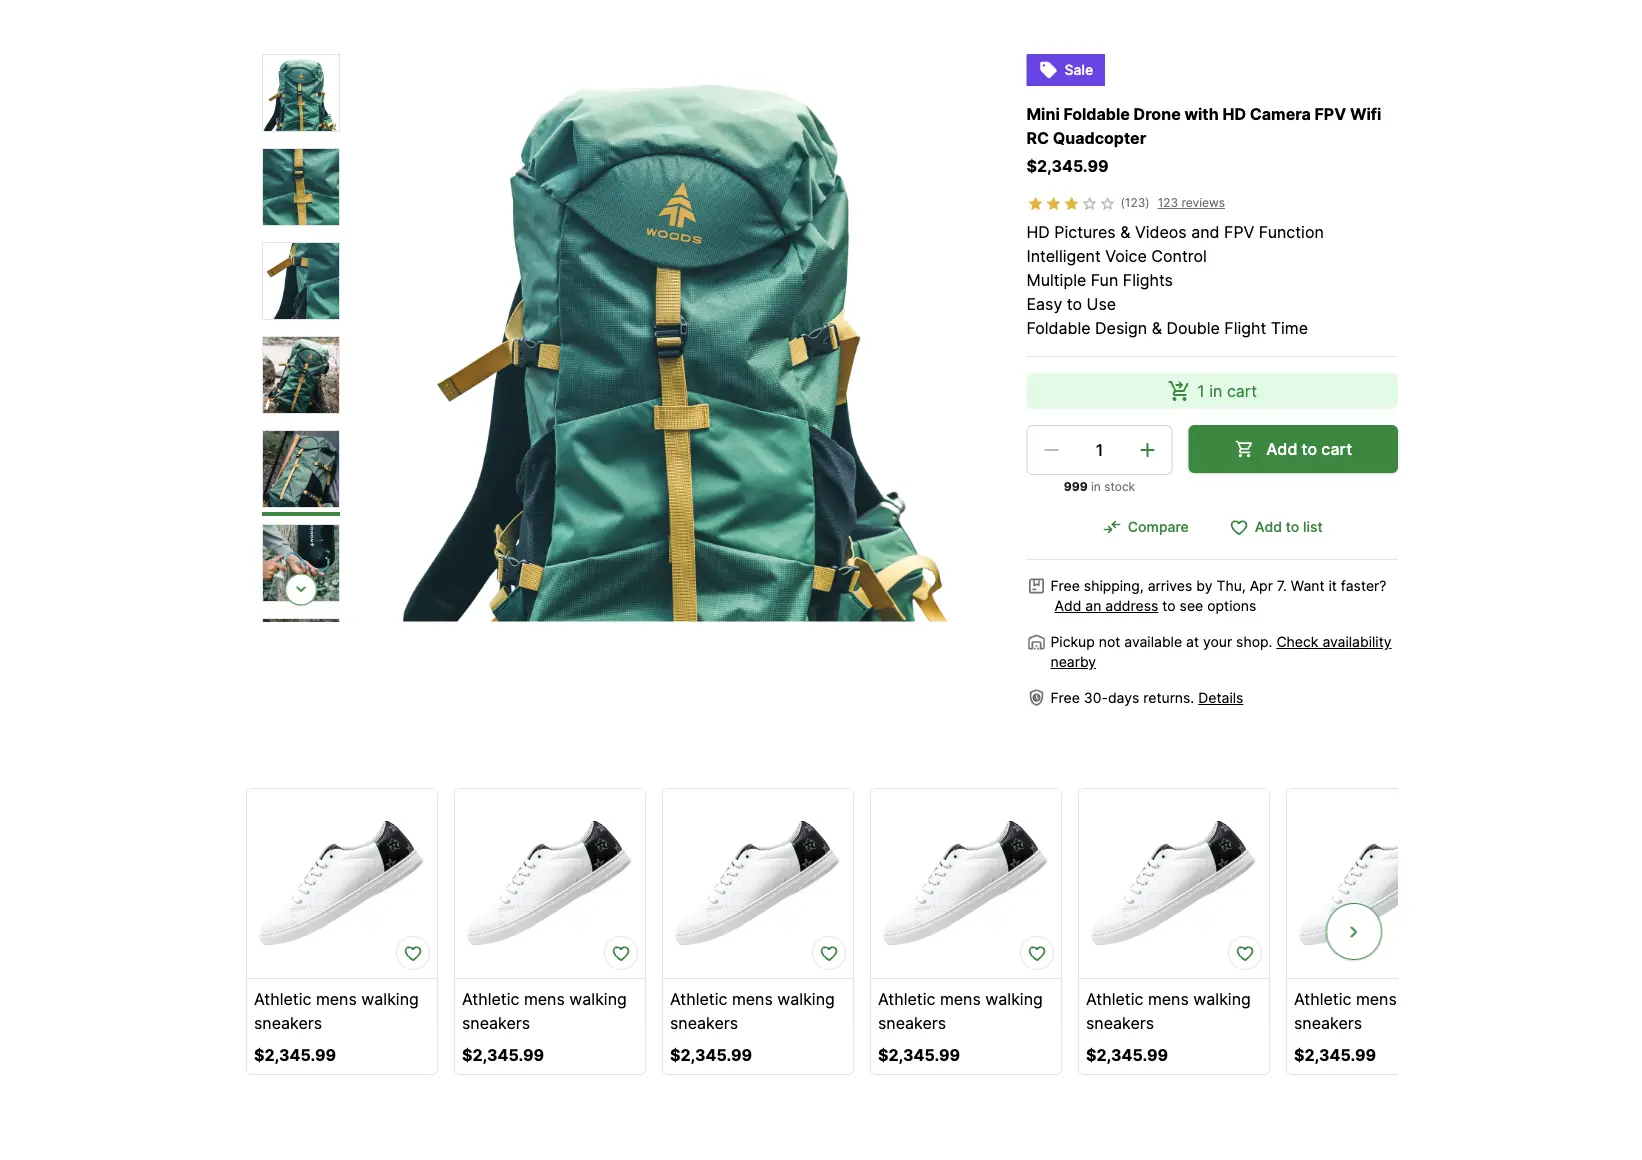
This looks much better!
Our Product Details page is ready! With only a few simple steps and a bit of styling, we have built a modern and responsive Product Details page. In the next section, we will learn how to connect the Product Details page with the SAP Commerce Cloud.
You can find the complete implementation in the product-page branch
Summary
In this guide, we have successfully installed and configured Storefront UI and built a Product Details page using Storefront UI components and blocks. We have also added some basic styles to the page to make it look more appealing and responsive.
In the next section, we will learn how to connect the Product Details page with the SAP Commerce Cloud.