Contentful
Contentful is a headless content management system that allows rapidly build the dynamic experiences your customers crave. Together with Alokai, you can create a powerful and flexible solution for your business. This guide presents how to add the Contentful module to your Storefront.
Read more
Check the Content Management System Overview to learn more about the features of the Contentful module.
Bootstrapping Contentful with Alokai Storefront
To get access to this module and installation assistance, please contact the Alokai sales team or reach out to your Customer Support Manager.
Update variables
By default, the module installation will connect your Storefront to our demo Contentful space. To connect it to a different space, update both .env.example and .env files in the Middleware directory.
- CNTF_TOKEN=<alokai-contentful-token>
+ CNTF_TOKEN=<your-contentful-token>
- CNTF_SPACE=<alokai-contentful-space>
+ CNTF_SPACE=<your-contentful-space>
- CNTF_ENVIRONMENT=<alokai-contentful-environment>
+ CNTF_ENVIRONMENT=<your-contentful-content-environment>
Make sure you have bootstrapped your Contentful space before connecting it to your Storefront.
Bootstrapping Contentful
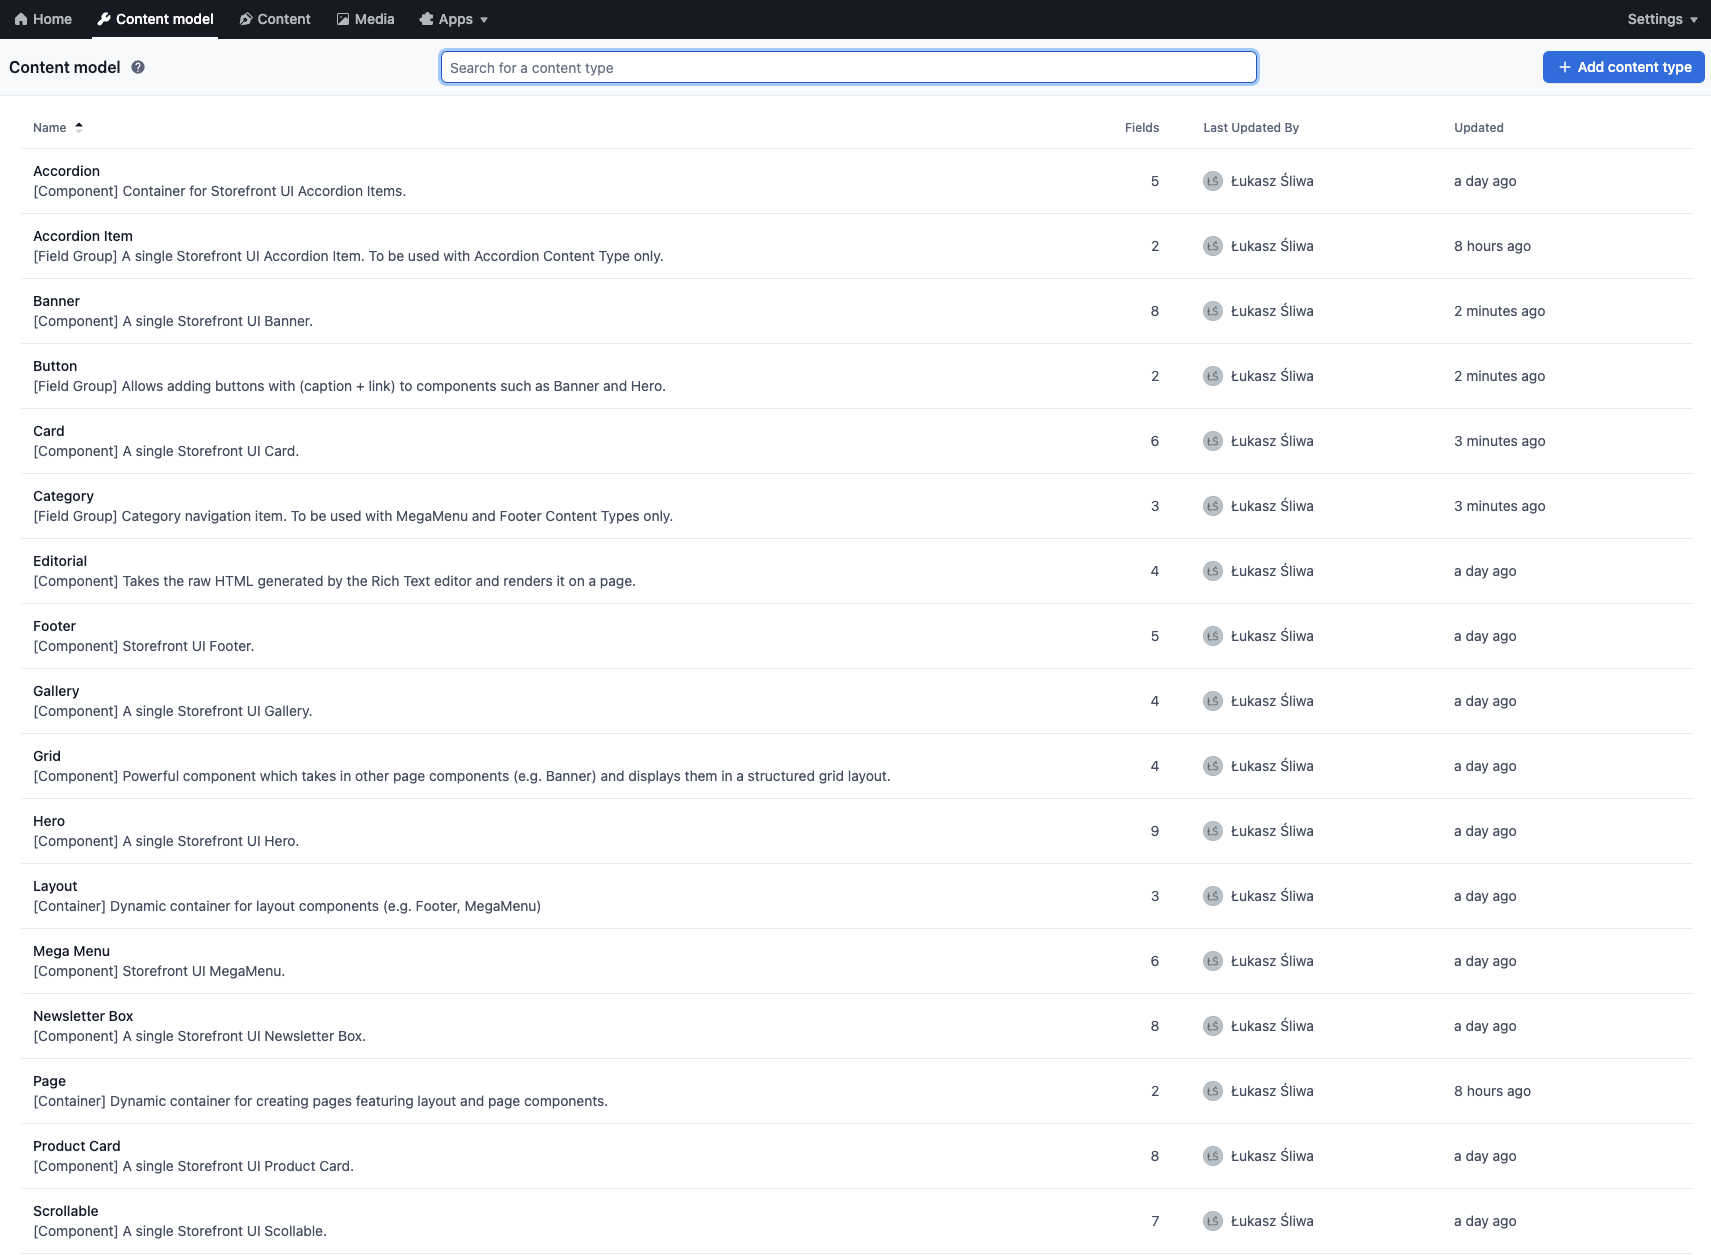
Before you start using our Contentful integration with your Contentful space, you need to import Alokai schemas into your space. They are aligned with our out-of-the-box frontend components.
Importing integration schemas
If you have installed the Contentful module in your Storefront, you will find the default schemas provided by Alokai in the apps/storefront-middleware/sf-modules/cms-contentful/schemas directory. To import them into your own Contentful space, use the CLI tool provided by Contentful:
Locale compatibility requirement
Contentful requires matching locales between source and destination spaces. Our integration schemas use "en" as the default locale. Before importing, ensure your destination space also uses "en" as its default locale to avoid compatibility issues. Or, if you wish to use another default local, you may search and replace "en" in the schemas.json with your default locale.
1
Navigate to the schemas directory
cd apps/storefront-middleware/sf-modules/cms-contentful/schemas
2
Execute the import command
contentful space import --space-id <your-space-id> --content-file ./schemas.json
Once done, the default Content Types should appear under the Content model tab in your Contentful space.
Enabling Live Preview
Contentful has a reliable Live Preview feature. It allows editors to display a preview of their website within Contentful and verify their content changes as they make them. Alokai gives you a straightforward way to enable the feature in your frontend application.

Enabling Live Preview starts with setting up a Content preview platform. In your Contentful space dashboard, click the ⚙️ cog icon in the top-right corner and select Content preview. Once the Content preview page loads, click the + Create preview platform button and complete the form:
- Preview platform name: A descriptive name for your platform (e.g.,
Development platform,Production platform) - Content types: Select Page, Category Page, and Product Page from the list
- Preview URL for Page:
http(s)://<host>/{locale}{entry.fields.url}?preview=true&cms-locale={locale} - Preview URL for Category Page:
http(s)://<host>/{locale}{entry.fields.url}?preview=true&cms-locale={locale}(same as for Page) - Preview URL for Product Page:
http(s)://<host>/{locale}/product/<product-path>?preview={entry.fields.url}&cms-locale={locale}
Understanding the Preview URL Pattern
<host>: The hostname where your application is running. For development environments, use a localhost address (e.g.,localhost:3003). For production environments, use your application's domain in Alokai Cloud (e.g.,my-app-europe-west1-gcp-storefrontcloud-io.i.alokai.cloud).
To enable Live Preview in both development and production environments, create two separate preview platforms with their respective host configurations.
{locale}: A Contentful placeholder that gets replaced with the selected locale code when previewing content in the Live Preview window. This placeholder ensures that changing the locale in Contentful affects the entire application's locale (which is path-based in Next.js).
Locale mismatch may cause 404 errors
If any of your Contentful locales don't match the locales configured in your application's i18n settings, the preview may display a 404 (Not Found) page. To prevent this, ensure your locale configurations are aligned or implement locale fallback mapping in your i18n configuration.
Alternatively, if you only need CMS content to be localized (not the entire application UI), you can omit the {locale} path segment from the preview URL and rely solely on the ?cms-locale={locale} query parameter.
{entry.fields.url}: A Contentful placeholder that dynamically inserts the URL of the currently previewed page (e.g./about).?preview=true: A query parameter that signals to the Alokai Contentful module that the Storefront is being rendered within the Live Preview window, enabling preview-specific functionality.?cms-locale={locale}: A query parameter used by the Alokai Contentful module to fetch content in the correct locale. This parameter uses the Contentful{locale}placeholder, which gets replaced when the Storefront opens in the Live Preview window. This parameter is particularly useful when your Contentful locales don't exactly match your Storefront's i18n configuration. It ensures that CMS content is displayed in the correct language, even if the application's UI (navigation, buttons, labels, etc.) remains in a different language. For example, you can preview German CMS content while the rest of the application interface remains in English.<product-path>(Product Page only): The path to a specific product in your catalog (e.g.,/my-product-slug/12345). This serves as the base page where your dynamic CMS content will be previewed.
No additional actions are required in your Alokai Storefront. Ensure your frontend application is running on the same port specified in the preview URL. By default, this is port 3000 for Next.js and 3333 for Nuxt.
Verifying Your Live Preview Setup
To verify your Live Preview configuration:
- Navigate to the Content tab in Contentful
- Select a page to preview (e.g., a Category Page or Product Page)
- In the right sidebar, verify that the Active locales section contains all the locales you want to preview
- In the Preview section, ensure your desired preview platform is selected
- Click the Open Live Preview button
Your application should now load in the Live Preview window, displaying the selected content in the chosen locale.
::
Using Preview Content
Preview content is supported since @vsf-enterprise/contentful-api@5.1.0
To enable preview content functionality, follow these steps:
1
2
Add x-preview header to the request
Include the x-preview header in the request.
// Update the default request config...
unifiedCms:buildModule(middlewareModule<UnifiedCmsEndpoints>, {
  apiUrl: `${config.apiUrl}/contentful/unified`,
  cdnCacheBustingId: config.cdnCacheBustingId,

  defaultRequestConfig: {
    getConfigSwitcherHeader,
    headers: {
      ...getRequestHeaders(),
+      'x-preview': 'true',
    },
  },

  ssrApiUrl: `${config.ssrApiUrl}/contentful/unified`,
}),

// ...or add it to the request config for a single request...
+ import { prepareConfig } from "@alokai/connect/sdk";

const { data } = await sdk.unifiedCms.getPage(
  params,
+  prepareConfig({
+    headers: {
+      'x-preview': 'true',
+    },
+  })
);

// ...or add it to the request based on the query params
+ import { prepareConfig } from "@alokai/connect/sdk";
+ import { useSearchParams } from 'next/navigation';

+ const searchParams = useSearchParams();
+ const preview = searchParams.get('preview');

const { data } = await sdk.unifiedCms.getPage(
  params,
+  prepareConfig({
+    headers: {
+      'x-preview': preview ? 'true' : undefined,
+    },
+  })
);
Enable Live Preview (optional)
Contentful's Live Preview feature requires a specific security configuration in your frontend application.
Set CSP header
The most secure way to enable live-preview is by configuring the Content-Security-Policy header with the frame-ancestors directive. This allows you to specifically whitelist trusted domains like Contentful while maintaining protection against clickjacking attacks from untrusted sources.
Add the following CSP header to your Next.js configuration:
/** @type {import('next').NextConfig} */
const nextConfig = {
  async headers() {
    return [
      {
        source: '/(.*)',
        headers: [
          {
+            key: 'Content-Security-Policy',
+            value: "frame-ancestors 'self' https://app.contentful.com;"
          }
        ]
      }
    ];
  }
  // ...
};
Alternative: Disable X-Frame-Options header
If you prefer a simpler configuration or need broader iframe support, you can remove or modify the X-Frame-Options header in your Next.js configuration. You can do this by setting the NEXT_PUBLIC_DISABLE_X_FRAME_OPTIONS_HEADER environment variable to true.
+ NEXT_PUBLIC_DISABLE_X_FRAME_OPTIONS_HEADER=true
Removing or modifying the X-Frame-Options header may have security implications. Consider your specific security requirements before making changes.