SAP Commerce Cloud: Assisted Service Mode
The Assisted Service Mode (ASM) is a module that allows customer support agents to emulate customers and perform actions on their behalf. This powerful tool provides a seamless way for support agents to assist customers in real-time, enhancing the overall customer experience.
Features
The Assisted Service Mode module provides a set of features designed to enhance customer support process, such as:
- UI component to manage the emulation process
- Customer search with autocomplete
- Emulation of the customer's account
- Cart binding
- Session timer
- Customer 360 view
- Additional API methods on the middleware layer
Installation
Prerequisite: Make sure you have the @vsf-enterprise/unified-api-sapcc package version 6.x or later installed in your project.
To get access to this module and installation assistance, please contact the Alokai sales team or reach out to your Customer Support Manager.
Nuxt performance
The ASM module installer automatically configures lazy loading of the <AsmPanel /> component. The steps below are already applied during installation and are documented here for reference only.
For better performance, the <AsmPanel /> component is loaded lazily. Combined with the isVisible property from the useAsmUi composable it will only be loaded when needed. This is achieved by using the Nuxt built-in feature of auto-imports along with lazy imports.
The module installer adds the following configuration to nuxt.config.ts:
// storefront-unified-nuxt/nuxt.config.ts

// ...
  components: [
    {
      path: '@sf-modules/sap-asm/components',
      extensions: ['.vue'],
    },
    '~/components',
  ],
// ...
It also updates the layouts/root.vue file to use the <LazyAsmPanel /> component instead of <AsmPanel />.
How to use the ASM module
UI Panel
The ASM module introduces an additional panel to the user interface. This panel is where the ASM Agent logs in using a single login form. Once logged in, the agent can search for a specific customer.
You can display the ASM panel by adding the asm=true query parameter, e.g.: https://my-domain.com/category?asm=true. You can add this parameter to any page URL to open the ASM panel since the component is added globally on the app level.
Logging in as an ASM Agent
To login as an ASM Agent, you need to provide the credentials of the Customer Support Agent. This user must have the necessary permissions to access the ASM module here. You can configure it in SAP Backoffice. Logging in with a regular customer account credentials will be rejected.

Only one user session can be active at a time. You can either be logged in as a ASM Agent or the customer, but not both at the same time. If you are logged in as a customer, you need to log out before logging in as an ASM Agent.
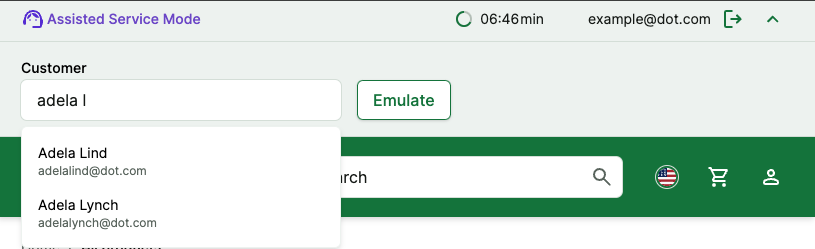
Customer Search
Once logged in as an ASM Agent, you can search for a customer by typing their name, email, or any other identifying information. The ASM module will display a list of matching customers, and you can select the one you want to emulate.
Emulating a Customer
When you select a customer to emulate, the ASM module will switch to the customer's account. The cart, personal data, and other information will be displayed as if you were the customer. During the emulation, every action that you will perform will be done on behalf of the customer, such as:
- Adding or removing products from the cart
- Changing the quantity of products in the cart
- Modifying the customer's personal data
- Applying discounts
- Creating and viewing orders
Emulation Control
The ASM Agent can stop the emulation at any time and start it again for a different customer. This flexibility allows the agent to assist multiple customers in a single session.

Cart Binding
During the emulation, the ASM Agent can bind a different cart ID to the emulated customer. It can be achieved by providing a new cart ID within a modal. This action will replace current customer's cart. This feature allows the agent to manage the customer's shopping cart effectively.
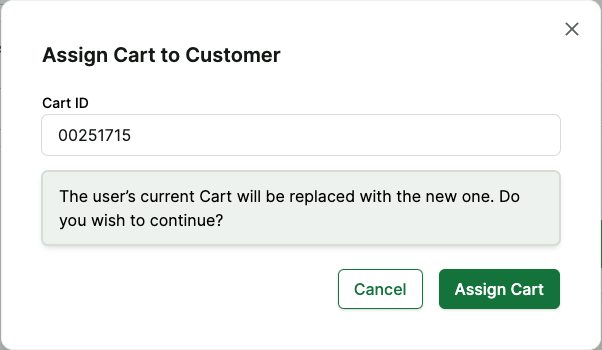
Only a cart created by logged out customer or created without an active emulation can be bound to the emulated customer's account.
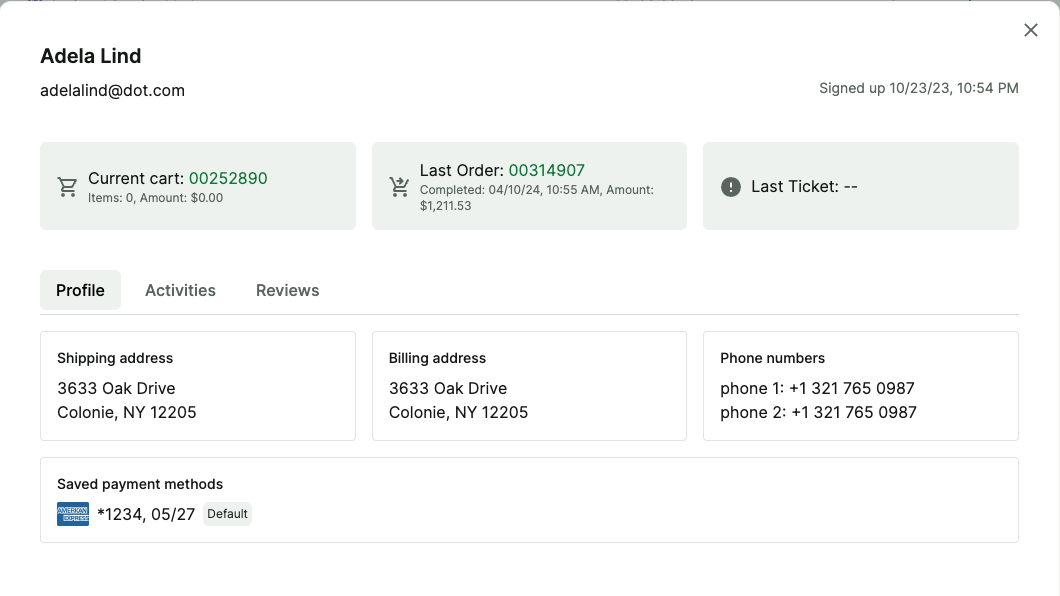
Customer 360 View
View all the customer's information in one place. The ASM module provides a 360 view of the customer, including personal data, orders, and other relevant information. This feature allows the ASM Agent to quickly access the customer's details and provide better support.
Session Timer
While the ASM Agent is logged in, a timer is displayed ![]() , showing the time remaining until the ASM Agent's session automatically ends. This feature ensures that the agent's access to the customer's account is limited and secure.
, showing the time remaining until the ASM Agent's session automatically ends. This feature ensures that the agent's access to the customer's account is limited and secure.
Session time will be prolonged after each page navigation or page refresh.
Upgrading to 2.0.0? If you are upgrading from a pre-2.0.0 version, review the 2.0.0 migration guide for platform-wide changes (Tailwind 4, Nuxt 4, Next.js 16, ESM-only middleware, improved error handling) that may affect your ASM setup.
The Assisted Service Mode (ASM) module is a powerful tool for enhancing customer support. By allowing agents to emulate customers and perform actions on their behalf, it provides a seamless and efficient way to assist customers in real-time.