Alokai Compass
Alokai Compass is a powerful framework designed for building AI workflows in e-commerce applications. It allows you to enhance your customers' journey. For example, you can build workflows that will help users:
- Search for products faster
- Compare different products and find the best pick
- Rate products by specific use cases
- Automate bulk-orders
Architecture
Alokai Compass module consists of two main elements:
- @alokai/compass: core library exporting AI integration, utils and type definitions to be used in your Storefront,
- @alokai/compass-module: an out-of-the-box set of configuration files, workflows, tools, assets, components and hooks copied over to your Storefront during the module installation process
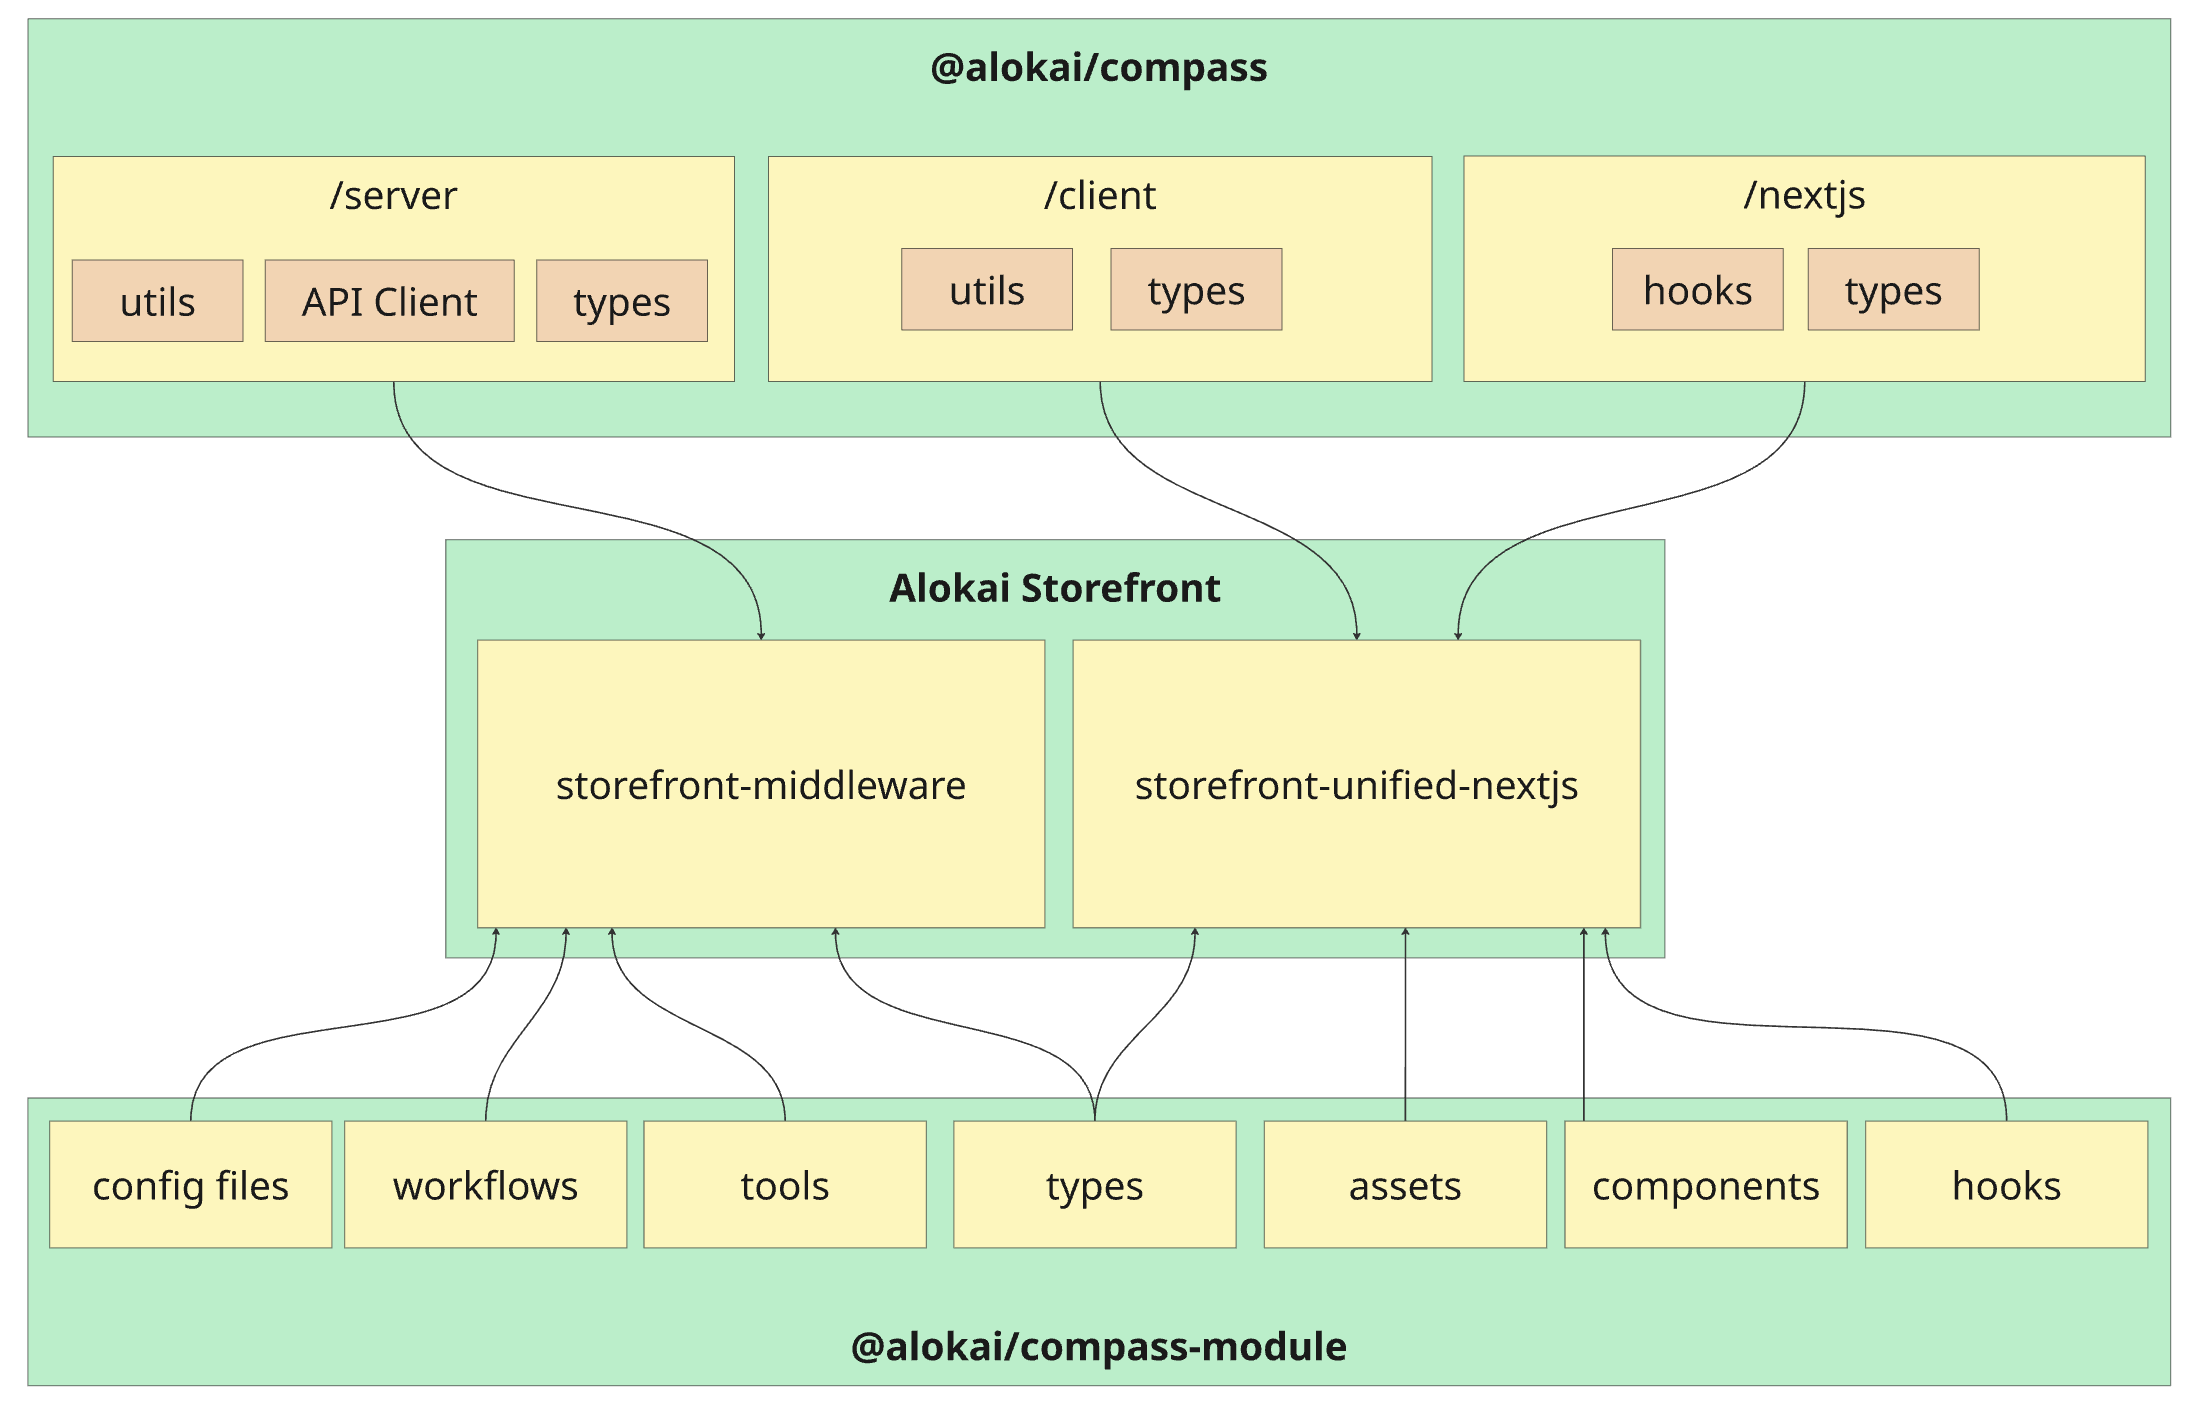
To adjust out-of-the-box functionalities provided by @alokai/compass-module and create your own, you have to get familiar with the building blocks provided by @alokai/compass: Workflows, Actions, Tools and Transitions.
Workflows
Workflow is the core building block of Alokai Compass. It represents a single, focused type of AI interaction. Think of it as a conversation path that helps users accomplish specific tasks. Each workflow consists of the following key components:
- Actions: specific tasks performed by LLM
- Tools: functions available in actions, callable by LLM
- Transitions: map of how workflow actions are linked to each other
import { defineWorkflow } from '@alokai/compass';

const assistantWorkflow = defineWorkflow({
  actions: {},
  toolkits: [],
  transitions: {},
  startingPrompt: ''
});
Actions
Action is a specific task the LLM performs within a workflow. When defining an action, you need to:
- choose AI model the action should use,
- define prompts the action's AI model should follow,
- choose tools the action's AI model should have access to.
Example
import { defineAction } from '@alokai/compass';

const assistantAction = defineAction({
  model: 'heavy',
  prompt: 'You are an assistant in a clothing store',
  type: 'llm',
  toolkit: ['searchProducts'],
});
See the full list of models you can pass to the model option on the Available models page.
Tools
Tool is a special Javascript function that can be called by an LLM within an Action. It comes with name, description and - optionally - a Zod schema informing the LLM about the expected tool arguments.
Tools are defined globally at the Workflow level, while Actions only reference tool names. This allows you to define tools once and selectively make them available to specific actions based on their needs.
import { defineWorkflow, defineTool } from '@alokai/compass';

const exampleTool = defineTool({
  name: 'exampleTool',
  // ...other tool properties
});

const exampleWorkflow = defineWorkflow({
  actions: {
    exampleAction: {
      //...
      toolkit: ['exampleTool'], // Reference tool by name
    }
  },
  toolkits: [exampleTool], // Include actual tool definition
  //...
});
Only include tools that are essential for each action. Tool schemas are sent to the LLM with every request, increasing token usage and costs.
Example 1
A simple tool calculating a sum of two numbers:
import { z } from 'zod';
import { defineTool } from '@alokai/compass';

const addNumbersTool = defineTool(
  {
    schema: z.object({
      a: z.number(),
      b: z.number(),
    }),
    description: 'Adds two numbers',
    name: 'addNumbers',
  },
  async (context, { aiProvidedArgs }) => {
    return aiProvidedArgs.a + aiProvidedArgs.b;
  },
)
Example 2
A tool with a dynamic schema that demonstrates several key concepts: schema callback with access to context, optional caching, and real-time data streaming to the frontend. This tool calls the SAPCC searchProducts API method and uses sendToBrowser() to immediately send results to the user interface:
import { defineTool, sendToBrowser } from '@alokai/compass';
import type { Endpoints as UnifiedEndpoints } from '@vsf-enterprise/unified-api-sapcc';
import { z } from 'zod';

const searchProducts = defineTool(
  {
    name: 'searchProducts',
    description: 'Searches for products in a catalog',
    schema: async (context) => z.object({
      category: z.string().optional(),
      currentPage: z.number().optional(),
      pageSize: z.number().optional(),
      search: z.string().optional(),
      sortBy: z.string().optional(),
    }),
    cache: {
      key: async () => 'catalogOverview',
    },
  },
  async (context, { aiProvidedArgs }) => {
    const commerceApi = await context.getApiClient<{ unified: UnifiedEndpoints }>('commerce');

    const response = await commerceApi.api.unified.searchProducts(aiProvidedArgs);
    sendToBrowser(response);

    return 'Product search results sent to the user. Ask if he needs further assistance.';
  },
);
The sendToBrowser(response) function sends the search results directly to the frontend through a custom event stream, allowing users to see products immediately while the AI continues processing. This creates a responsive user experience where data appears instantly rather than waiting for the complete AI response.
Workflow Payloads
Workflow payloads are structured data sent from the frontend to the AI workflow alongside the user's message. They parametrize tool schemas and callbacks based on application state — for example, telling a tool which product the user is looking at so it can build a schema with only that product's variants.
Payloads are available in a tool's schema function and callback via the { workflowPayload } parameter:
import { defineTool } from '@alokai/compass';
import { z } from 'zod';

const setGuidedSellingConfiguration = defineTool(
  {
    name: 'setGuidedSellingConfiguration',
    description: 'Configures a product variant based on selected attributes.',
    payloadSchema: z.object({
      product: z.object({ id: z.string().optional() }).optional(),
    }),
    schema: async (context, { workflowPayload }) => {
      const productId = workflowPayload?.product?.id;
      if (!productId) {
        return z.object({}).describe('No product ID provided.');
      }
      const commerceApi = await context.getApiClient('commerce');
      const response = await commerceApi.api.unified.getProductDetails({ id: productId });
      const variants = response.product?.variants ?? [];
      return z.object({
        productId: z.literal(productId),
        variantId: buildVariantIdSchema(variants),
      });
    },
  },
  async (context, { aiProvidedArgs, workflowPayload }) => {
    // workflowPayload is typed via payloadSchema
    // aiProvidedArgs is typed via the schema return value
  },
);
The optional payloadSchema defines the minimal subset of the payload that a given tool requires and provides TypeScript inference for workflowPayload in the callback. A single workflow payload can carry many different pieces of information intended for different tools — each tool declares only the slice it needs via its own payloadSchema. The schema function always receives the full workflowPayload as Record<string, unknown>.
On the frontend, payloads can be passed per-request via the sendMessage options, or computed automatically through AiStateProvider's workflowPayloadBuilder which recomputes the payload on every state change.
Conditionally enabling tools with shouldEnableTool
Tools support a shouldEnableTool predicate that controls whether the tool is made available to the LLM for a given workflow run. The predicate receives context and { workflowPayload } and returns a boolean. When it returns false, the tool is excluded before the LLM sees it — the model cannot call a disabled tool.
This is useful when a tool only makes sense in certain states — for example, a variant configuration tool that requires a product to be selected first:
import { defineTool } from '@alokai/compass';
import { z } from 'zod';

const setGuidedSellingConfiguration = defineTool(
  {
    name: 'setGuidedSellingConfiguration',
    description: 'Configures a product variant based on selected attributes.',
    shouldEnableTool: (context, { workflowPayload }) => {
      return Boolean(workflowPayload?.product?.id);
    },
    schema: async (context, { workflowPayload }) => {
      // Only called when shouldEnableTool returned true,
      // so workflowPayload.product.id is guaranteed to exist
      const productId = workflowPayload.product.id;
      // ... build schema from product variants
    },
  },
  async (context, { aiProvidedArgs }) => {
    // ...
  },
);
When the user hasn't selected a product yet, the LLM won't see this tool at all. Once a product is selected and the workflow payload includes product.id, the tool becomes available.
Transitions
Transitions are relationships between actions, describing how the control should be passed between them as the workflow progresses.
Example 1
A linear transition between two actions:
import { defineWorkflow, START, END } from '@alokai/compass';

const assistantWorkflow = defineWorkflow({
  actions: {
    actionA: {/* action configuration */},
    actionB: {/* action configuration */ }
  },
  transitions: {
    [START]: 'actionA',
    ['actionA']: 'actionB',
    ['actionB']: END,
  },
});
Example 2
A choice transition featuring prompts for LLM to help it decide which action to call:
import { defineWorkflow, START, END } from '@alokai/compass';

const assistantWorkflow = defineWorkflow({
  actions: {
    actionA: {/* action configuration */},
    actionB: {/* action configuration */ }
  },
  transitions: {
    [START]: {
      to: [
        {
          id: 'actionA',
          when: 'when user message says "cat"',
        },
        {
          id: 'actionB',
          when: 'when user message says "dog"',
        },
      ],
      type: 'choice',
    },
    ['actionA']: END,
    ['actionB']: END,
  },
});
Data Flow
The data flow in Alokai Compass is driven by AI workflow orchestration, creating a sophisticated, non-linear process. The complexity varies depending on your workflow design. Here's how the example Quotes workflow operates:
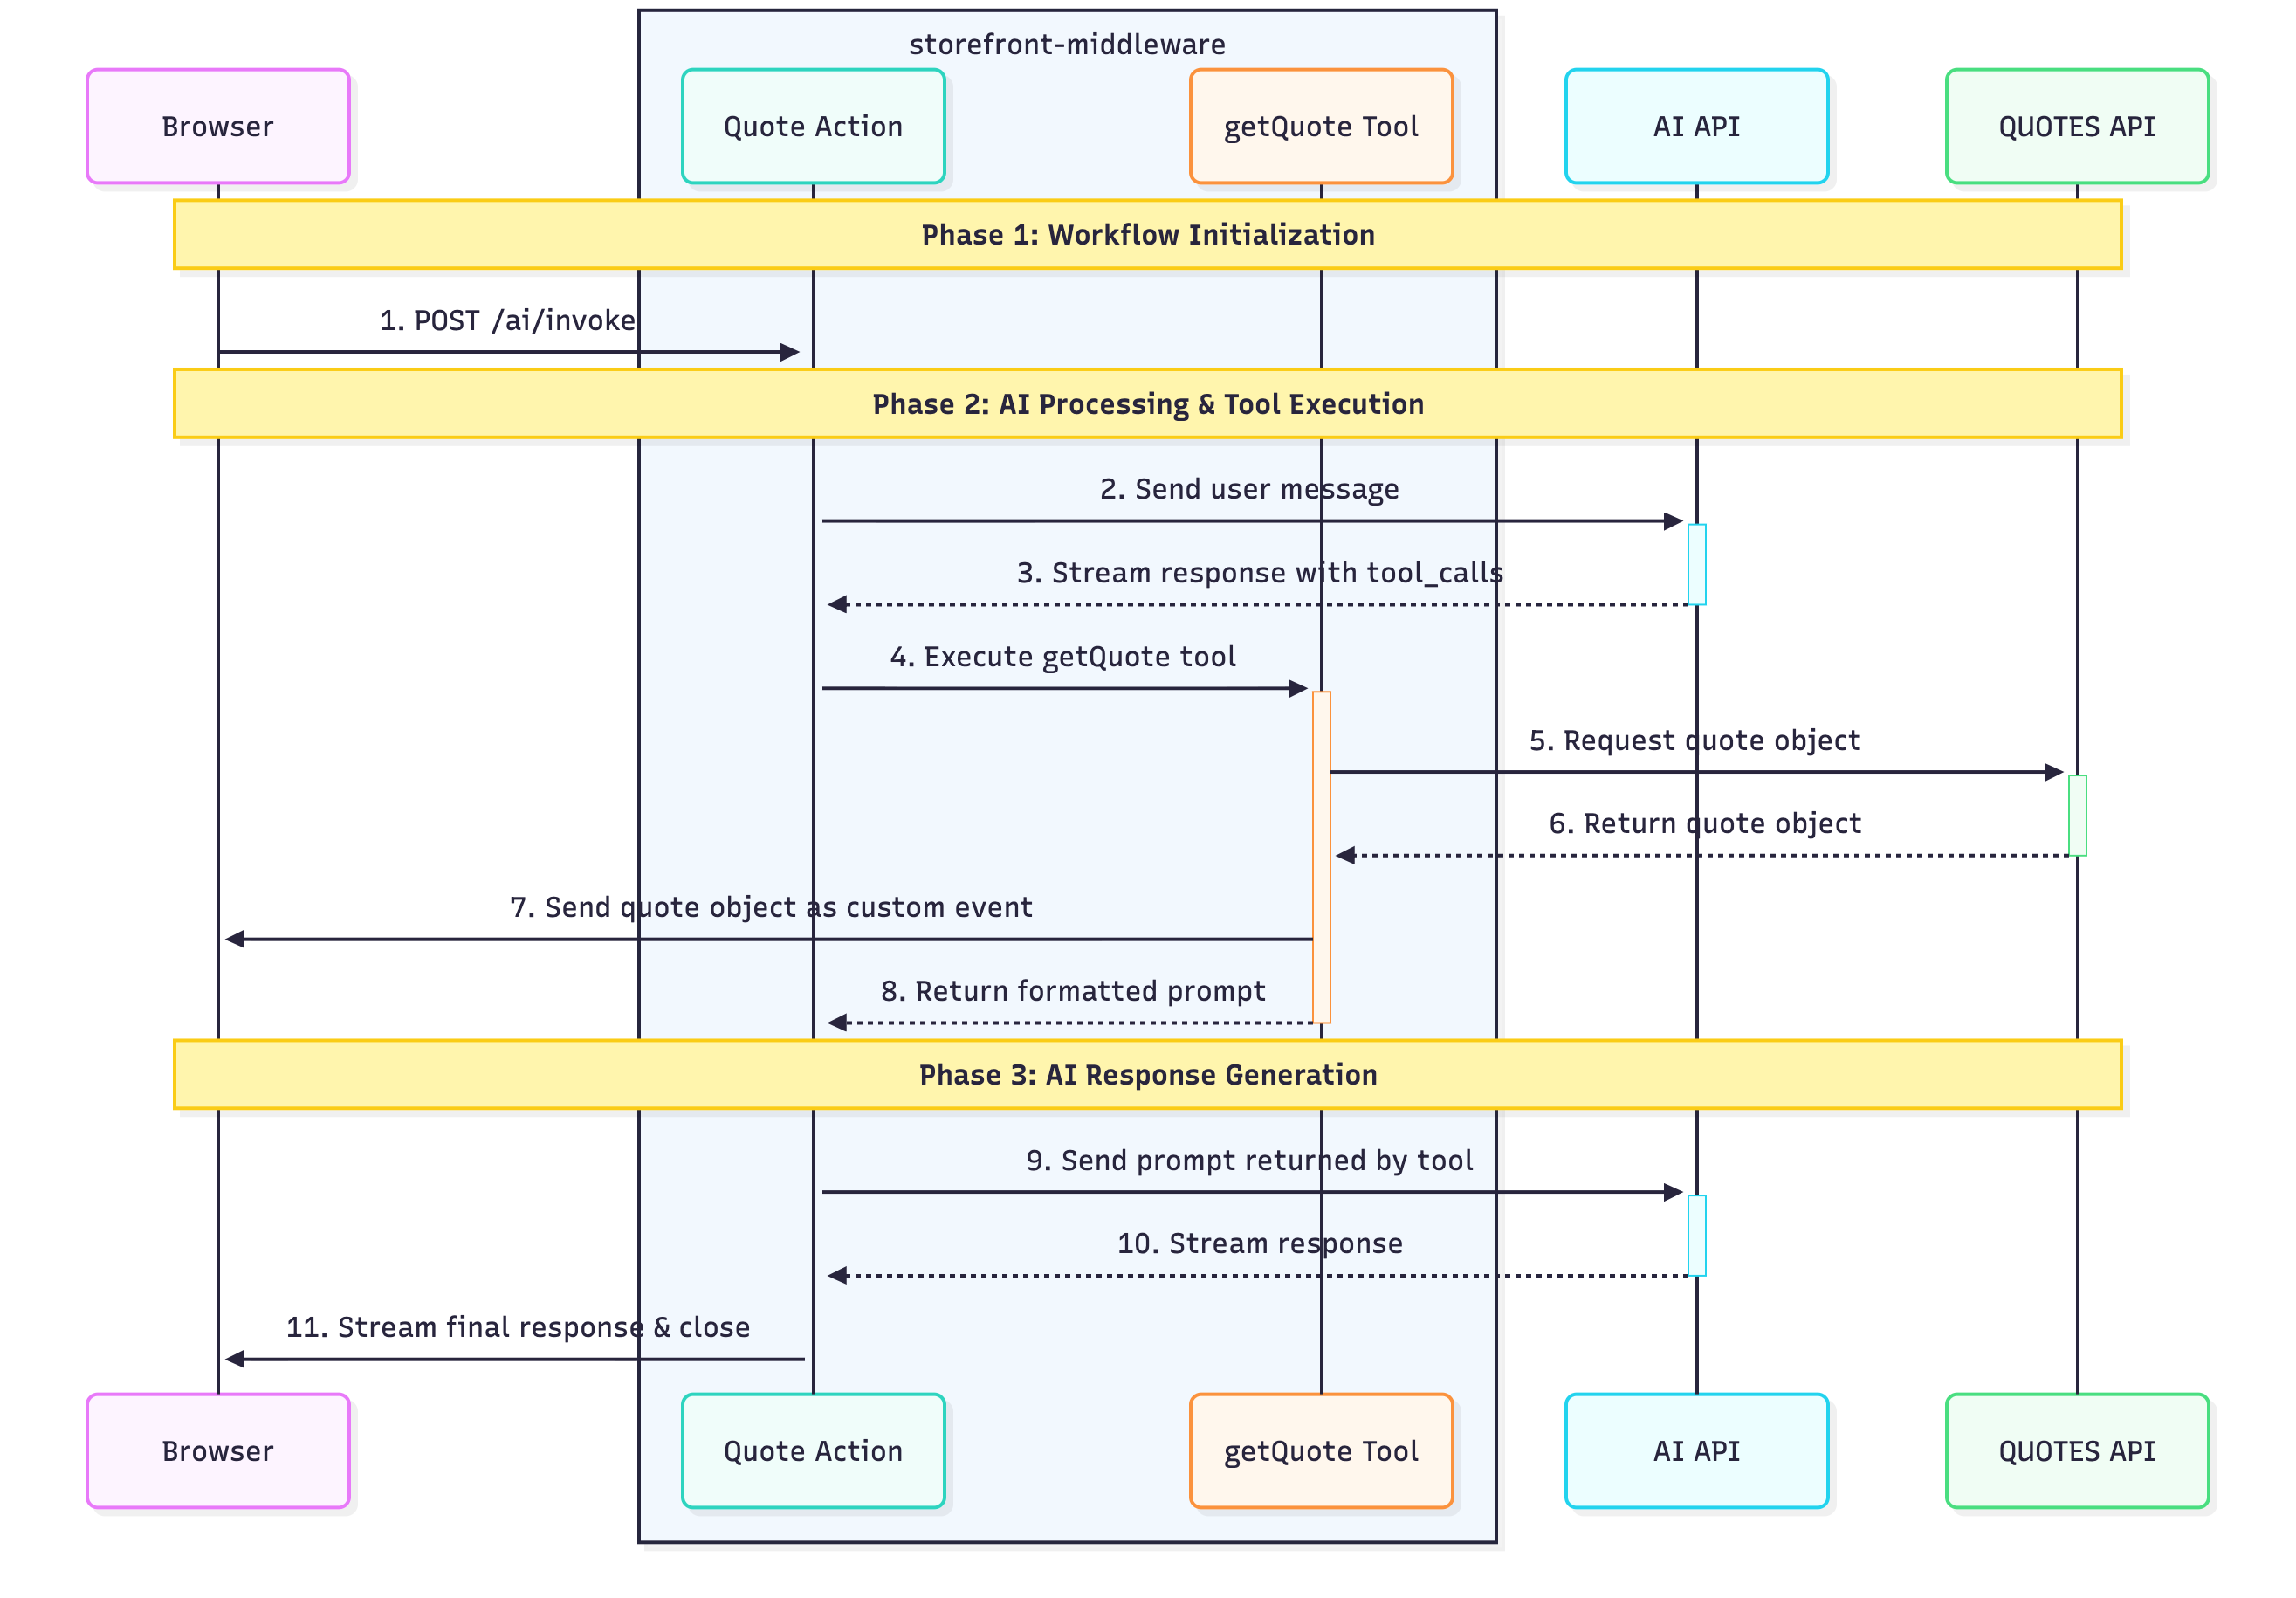
Workflow Trigger
The storefront-unified-nextjs application sends a request to the ai/invoke endpoint in storefront-middleware.
Workflow Activation
The storefront-middleware application initializes and starts the quotes workflow.
Quote Action Execution
The workflow triggers the quote action, which sends the user's message to the AI API.
Tool Call Generation
The AI API analyzes the user's request and determines which tools are needed to fulfill it. It responds with a tool_calls array that specifies exactly which tools to execute:
{
  "tool_calls": [
    {
      "name": "getQuote",
      "args": {},
      "id": "call_14fTKJBG6aVNmE1xJ4dVvxyO",
      "type": "tool_call"
    }
  ]
}
Tool Execution
The quote action executes the getQuote tool, which:
- Sends a request to the DummyJSON Quotes API
- Receives quotes data from the Quotes API
- Sends the quote data directly to the browser
- Returns a formatted prompt for the next AI interaction
Final AI Call
The quote action sends the prompt returned by the getQuote tool back to the AI API for final processing.
Final AI Response
The AI API generates the final, user-friendly quote explanation.
Stream Completion
The storefront-middleware sends the final AI response to storefront-unified-nextjs as the last chunk of the response stream that was opened during the tool execution phase.
This architecture enables Compass to provide intelligent, context-aware responses while maintaining real-time user feedback through streaming events.
Prompts
Writing effective prompts is essential for achieving satisfactory results from your workflows. Just like humans, LLMs require clear and precise instructions to perform tasks well.
While detailed guidance on writing good prompts is beyond the scope of this documentation, we highly recommend reading Anthropic's comprehensive guide on prompt engineering.
When building a workflow, you can define prompts in two places:
- Workflow: The
startingPromptproperty, - Action: The
promptproperty.
The key difference between these prompt types lies in when and how often they are sent to the AI API:
- Workflow's
startingPrompt: Included in every API call throughout the entire workflow execution, providing persistent context - Action's
prompt: Only included when that specific action is being executed, providing action-specific instructions
Let's examine how prompts are handled when invoking the following workflow with a "Hello" message:
import { defineWorkflow, END, START } from '@alokai/compass';

defineWorkflow({
  actions: {
    actionA: {
      model: 'light',
      prompt: 'This is action A prompt',
      type: 'llm',
    },
    actionB: {
      model: 'light',
      prompt: 'This is action B prompt',
      type: 'llm',
    },
  },
  startingPrompt: 'This is the starting prompt',
  transitions: {
    [START]: 'actionA',
    actionA: 'actionB',
    actionB: END,
  },
});
When this workflow executes, Alokai Compass sends different messages arrays to the AI API for each action:
When executing Action A:
[
  {
    "role": "user",
    "content": [
      {
        "text": "Hello",
        "type": "text"
      }
    ]
  },
  {
    "role": "system",
    "content": "This is the starting prompt"
  },
  {
    "role": "system",
    "content": "This is action A prompt"
  }
]
When executing Action B:
[
  {
    "role": "user",
    "content": [
      {
        "text": "Hello",
        "type": "text"
      }
    ]
  },
  {
    "role": "assistant",
    "content": "Response from Action A..."
  },
  {
    "role": "system",
    "content": "This is the starting prompt"
  },
  {
    "role": "system",
    "content": "This is action B prompt"
  }
]
Notice how the starting prompt appears in both actions, while each action only receives its own specific action prompt. This design allows you to maintain consistent context throughout the workflow while providing action-specific instructions where needed.
AI-Controlled State
AI-Controlled State is a shared state store that both your UI and the AI can read and write. It enables features where the AI fills in form fields, selects options, or updates filters — and the UI reflects those changes in real time.
AiStateProvider wraps a section of your UI, creates a scoped store, and sets up two-way communication:
- State patches (AI → UI): the AI writes structured data into the store via
createStatePatch - Workflow payloads (UI → AI): the
workflowPayloadBuildersends current UI state to the workflow on every change - Context messages (UI → AI):
addContextMessagesends background info to the AI
For multi-step features (like guided selling), define steps to organise the UI into tabs with isolated per-step form data. Child components access the store via useAiControlledState().
Message Transformation
The message history sent to the LLM on each request can become large — especially when messages contain generative-UI payloads or other rich content. The transformMessageContent hook lets you trim or filter individual message content blocks before they reach the LLM, reducing token usage and costs.
You define transformMessageContent at the workflow level. Compass calls it once for each content block in every message. The hook receives the content block along with metadata (role, actionId, workflowId) and must return one of:
- The original or modified content — to keep it in the message history
null— to remove the message from history altogether.
import { defineWorkflow, isGenerativeUiComponent } from '@alokai/compass';
import { UI_COMPONENTS } from '@/sf-modules/compass/responses/dynamic-ui';
import { trimProductsList } from '@/sf-modules/compass/trimmers';

const chatbot = defineWorkflow({
  // ...actions, toolkits, transitions
  transformMessageContent: async ({ actionId, content, role }) => {
    // Remove greeting messages from history
    if (content.type === 'text' && content.text.includes("Hello! I'm Ellie")) {
      return null;
    }

    // Trim large generative-UI payloads to save tokens
    if (isGenerativeUiComponent(content, UI_COMPONENTS, 'products-list')) {
      // Skip tool-originated product lists in the search action entirely
      if (role === 'tool' && actionId === 'search-products') return null;
      return trimProductsList(content);
    }

    // Keep everything else as-is
    return content;
  },
});
The hook receives the following parameters:
| Parameter | Type | Description |
|---|---|---|
content | AssistantMessageContent | A single content block from the message |
role | "user" | "assistant" | "tool" | The role of the message that contains this content |
actionId | string | The ID of the action about to be executed |
workflowId | string | The ID of the current workflow |
When using the analytics workflow, do not trim content that contains sensitive data. The LLM must receive it in full so it can flag it as sensitive, allowing redaction in stored conversation history (GDPR requirement).
Cookie Handling During Streaming
When a Compass workflow runs in streaming mode, HTTP response headers are sent to the client before tools start executing. Any cookies set by middleware methods (via res.cookie() or res.setHeader('Set-Cookie', ...)) during tool execution would normally be silently dropped.
Compass automatically intercepts these cookie-setting calls during streaming, captures the cookies, and delivers them to the browser as streamed events. The SDK then applies them via document.cookie.
Example — setting a cookie inside a tool:
import { defineTool } from '@alokai/compass';

const setPreferenceTool = defineTool(
  {
    name: 'setPreference',
    description: 'Saves user preference as a cookie',
    schema: z.object({ theme: z.enum(['light', 'dark']) }),
  },
  async (context, { aiProvidedArgs }) => {
    context.res.cookie('theme', aiProvidedArgs.theme, {
      path: '/',
      maxAge: 60 * 60 * 24 * 365,
    });
    return `Theme preference set to ${aiProvidedArgs.theme}`;
  },
);
During streaming, the theme cookie is captured and delivered to the browser automatically — no extra code is needed on the frontend.
HttpOnly cookies are not supported during streaming. Because cookies are delivered via JavaScript (document.cookie), HttpOnly cookies cannot be set this way. They are dropped with a warning logged on the server. Non-streaming requests are unaffected — cookies set on res are delivered normally via HTTP headers.
What next?
Since you are now familiar with the Alokai Compass module architecture, let's install it in your Storefront and build the first workflow!